- Original Article
- Open access
- Published:
Modeling and Experimental Analysis of Roughness Effect on Ultrasonic Nondestructive Evaluation of Micro-crack
Chinese Journal of Mechanical Engineering volume 34, Article number: 114 (2021)
Abstract
A high-precision evaluation of ultrasonic detection sensitivity for a micro-crack can be restricted by a corroded rough surface when the surface microtopography is of the same order of magnitude as the crack depth. In this study, a back-surface micro-crack is considered as a research target. A roughness-modified ultrasonic testing model for micro-cracks is established based on a multi-Gaussian beam model and the principle of phase-screen approximation. The echo signals of micro-cracks and noises corresponding to different rough front surfaces and rough back surfaces are obtained based on a reference reflector signal acquired from a two-dimensional simulation model. Further comparison between the analytical and numerical models shows that the responses of micro-cracks under the effects of different corroded rough surfaces can be accurately predicted. The numerical and analytical results show that the echo signal amplitude of the micro-crack decreases significantly with an increase in roughness, whereas the noise amplitude slightly increases. Moreover, the effect of the rough front surface on the echo signal of the micro-crack is greater than that of the rough back surface. When the root-mean-square (RMS) height of the surface microtopography is less than 15 μm, the two rough surfaces have less influence on the echo signals detected by a focused transducer with a frequency of 5 MHz and diameter of 6 mm. A method for predicting and evaluating the detection accuracy of micro-cracks under different rough surfaces is proposed by combining the theoretical model and a finite element simulation. Then, a series of rough surface samples containing different micro-cracks are fabricated to experimentally validate the evaluation method.
1 Introduction
Micro-cracks are one of the most common defects in industrial fundamental components such as pipes, plates, and bars. Moreover, certain crack extensions can be found under cyclic workloads and/or stress corrosion [1]. The lack of a timely detection and accurate evaluation of these defects might eventually lead to severe leakages, explosions, and potential environmental degradation. An ultrasonic testing method plays an important role in the providing a high-precision inspection and evaluation of defects [2]. A water immersion approach has been widely used for the ultrasonic inspection of industrial components owing to its advantages of high efficiency and ease of automation [3], such as in an ultrasonic climbing robot for storage tank walls, and in internal automatic scanning robots for long-distance natural gas pipelines.
However, it has been found that the surface microtopography has a great influence on the ultrasonic echo signals and signal-to-noise ratio of the micro-cracks, owing to the reflection, transmission, and scattering of the incident acoustic wave [4]. The crack sizes are generally much larger than the fluctuation height of the surface microtopography in the existing ultrasonic inspection cases. In Refs. [1, 2, 5], the surfaces of the workpiece to be detected were assumed to be perfectly smooth; however, in practical applications, the microscopic sizes of rough surfaces caused by corrosion may reach the same order of magnitude as the acoustic wavelength. Nevertheless, it is impractical to polish the entire surface to obtain accurate information of the micro-cracks in automated ultrasonic inspections with 100% full coverage. As a consequence of the developed requirements for the detection accuracy of micro-cracks, prediction and evaluation methods for the ultrasonic inspection of micro-cracks under the effects of unidealized surface conditions are the predominant research targets of this work.
The scattering characteristics of elastic waves on rough surfaces can be physically identified and described. A variety of theoretical and numerical analyses involving the scattering fields of different scatters have been developed [6, 7], such as the phase-screen perturbation approximation [8] and Kirchhoff theory [9, 10]. The validity of a perturbation approximation for rough surface scattering was investigated by Thorsos et al. using a Gaussian rough spectrum [11]. Ogilvy analyzed the multiple scattering of acoustic waves on rough defects, and predicted the echo response accurately using the Kirchhoff approximation [12]. Zhang et al. [13] demonstrated that the acoustic scattering on a rough crack surface was affected by the height deviation and correlation length of the surface microtopography using a local scattering model. Fan et al. [14] developed the elastic dynamic theory for the acoustic scattering field on a random rough solid-solid interface using the Kirchhoff approximation. Lian et al. [15] analyzed the theoretical relationship between the scattering attenuation coefficient of an ultrasonic pulse-echo and the roughness level. Notably, an ultrasonic testing system model can efficiently deliver thorough insights into different scatters by associating with the transmitted sound beams and receiving accurate responses [16, 17]. A modular multi-Gaussian beam model proposed by Jeong and Schmerr was applied to predict the output signal reflected from the corner of a vertical crack [18]. Kim et al. presented an ultrasonic measurement model for flat-bottom holes with a circular transducer based on a multi-Gaussian beam model [19]. Lu et al. demonstrated a pitch-catch model for the ultrasonic testing of curved surfaces [20]. However, there are relatively few previous works discussing an efficient method for describing and evaluating the detection accuracy of micro-cracks under rough surfaces.
To address this problem, the characteristics of rough surfaces and the phase-screen approximation are initially introduced in Section 2. A roughness-modified ultrasonic testing model for describing the pulse responses of micro-cracks under different rough surfaces is described in Section 3. An evaluation method for the detection accuracy of the micro-cracks is proposed by combining the analytical model and a numerical simulation. Then, Section 4 discusses the experimental verifications conducted to validate the proposed method.
2 Background
2.1 Rough Surface Characteristics
In general, the rough surfaces of a workpiece are generated by a large number of random, independent events. The microtopography characteristics of rough surfaces generally show differences owing to a variety of forming processes, such as casting, wire cutting, shot blasting, and corrosion. This study mainly focuses on the effects of corroded rough surfaces as caused by internal operating conditions (temperature and pressure) and chemical conditions (pH) of the inner and outer walls of vessels and pipelines. Studies in Refs. [21, 22] measuring the surface microtopography of corroded pipes have indicated that the height probability distribution of general uniform corrosion tends to have a Gaussian distribution.
The microtopography of a rough surface presents a three-dimensional fluctuation distribution, and the fluctuating peaks and valleys vary within a certain range under different roughness conditions. The surface roughness is a comprehensive evaluation parameter, and different methods have been proposed for describing rough surfaces in a considerable number of studies. A simple expression of the probability distribution function of the microscopic profile height of a Gaussian random surface can be written as Eq. (1) [22].
where, h represents the height of the sampling point along the surface, and σ is the root-mean-square (RMS) height (controlling the vertical deviation of the roughness).
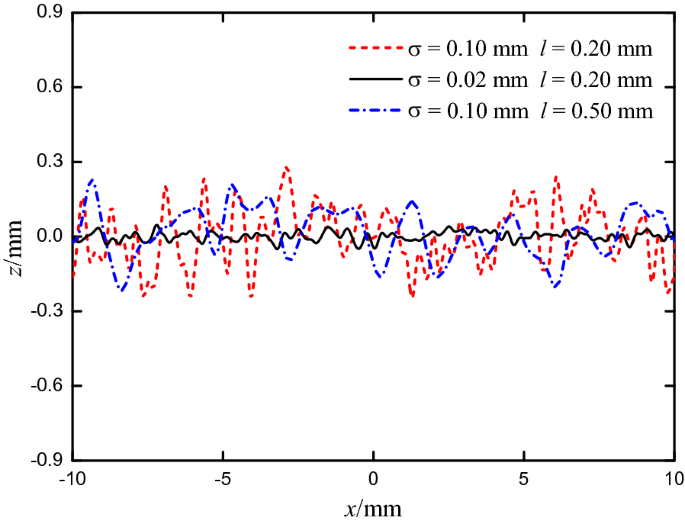
A correlation function for characterizing the correlations of the local heights in the horizontal direction can be expressed as shown in Eq. (2). l is the correlation length for controlling the statistical independence of the heights of the two points. The roughness generation algorithm was demonstrated in Ref. [12]. The two parameters characterize the microtopography of a random rough surface, as shown in Figure 1.
2.2 Phase-screen Approximation
The ultrasonic detection and evaluation accuracy for micro-defects are severely affected by the surface conditions. A number of studies [21,22,23] have shown that longitudinal waves incident on the rough surface can cause multiple scattering, resulting in the attenuation of the transmitted waves used to detect the internal scatters. Nagy and Rose simplified the acoustic wave scattering into phase changes to analyze the reflection and transmission coefficients on a random rough surface; this approach was defined as the phase-screen approximation principle [24]. Coherent and incoherent wave fields are generated when an acoustic wave is obliquely launched into a rough interface during an ultrasonic water immersion inspection. The coherent waves as determined by Snell’s law [25] are in the same direction as a smooth surface for different rough surfaces, including reflected and transmitted waves. The incoherent scattering waves diverge in different directions. Based on the proposed principle, the phase change (in an exponential form) plays a dominant role in the variation of the coherent wave field.
For rough surfaces whose microstructure fluctuations in the surface profile conform to a Gaussian distribution, the random interface can be considered as equivalent to the phase disturbance screen when the RMS height σ is much less than \(\lambda_{s}\) and \(\lambda_{p}\) (the wavelengths of the shear wave and longitudinal wave, respectively). The coherent wave field consists of the reflected and transmitted wave fields of the smooth interface and phase factor. The correlation length of the rough surface in the horizontal direction has little significance on the echo response, as demonstrated in Ref. [26]. Consequently, the roughness-modified reflection coefficient \(R(\omega ,\theta_{i} )\) and transmission coefficient \(T^{p,s} (\omega ,\theta_{i} )\) can be expressed as follows:
where, \(R_{0} (\theta_{i} )\) and \(T_{0}^{p,s} (\theta_{i} )\) denote the reflection coefficient and transmission coefficient of the acoustic wave corresponding to the smooth surface, respectively. A and B refer to modified factors related to the ultrasonic testing system. The changes in the reflected and transmitted energies of oblique incident acoustic waves under different surface conditions in an ultrasonic water immersion inspection system can be obtained according to the above principle.
3 Theory and Simulation Analyses of Ultrasonic Testing Model
3.1 Roughness-modified Model
A multi-Gaussian beam model can describe the propagation of sound beams and acoustic fields through several interfaces and inside different media [27]. An ultrasonic testing system model can accurately present the echo responses of scatters, such as those from flat bottom holes, side-drilled holes, and cracks, under different detection conditions [28]. Wang et al. established an ultrasonic testing model for micro-defects in metal balls, and conducted a related experimental verification [29].
3.1.1 Ultrasonic Testing Model for Micro-crack
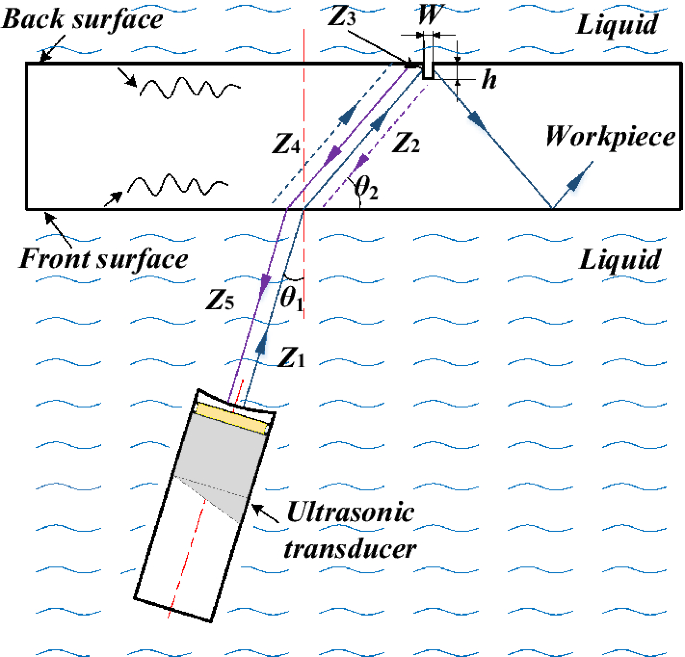
Shear waves are generally used to distinguish the inside scatters of workpieces with higher accuracy and sensitivity in ultrasonic water immersion testing. In this study, a general ultrasonic immersion testing model with a rough surface was established to describe the echo responses of micro-cracks, as shown in Figure 2. In the following, \(\rho_{m}\), \(c_{pm}\), and \(c_{sm}\) (m = 1, 2) represent the density, velocity of the longitudinal wave, and velocity of the shear wave in the coupled water/workpiece, respectively. The focal length of a line-focused transducer with a diameter of a and nominal frequency f is F. The depth and width of the micro-crack are h and W, respectively, and \(Z_{1}\), \(Z_{2}\), \(Z_{3}\), \(Z_{4}\), and \(Z_{5}\) represent the different propagation distances of the incident sound beam inside the liquid and solid, respectively. \(\theta_{1}^{p}\) and \(\theta_{2}^{s}\) denote the incident angle and refraction angle, respectively.
The micro-crack depth is normally less than five percent of the workpiece thickness; this is of the same order of magnitude as the wavelength of the shear wave. It is necessary to consider that in practical inspection, the conditions of both the front and back surfaces might change (e.g., become rough). The echo response of a crack in an isotropic material can be explicitly written as Eq. (5) [30].
where, \(V(\omega )\) denotes the average vibration velocity on the transducer surface caused by the echo wave; \(\beta (\omega )\) represents the system efficiency factor, and can be computed using the devolution of a reference signal; \(S_{T}\) describes the transducer surface, and \(v_{{}}^{back} (\omega )\) indicates the transient vibration velocity of the transducer surface as caused by a back-surface micro-crack. The roughness-modified time-domain signal of the micro-crack can be further calculated by using an inverse Fourier transform of the frequency-domain response.
3.1.2 Roughness-modified Model and Essential Components
A pressure wave generated from the immersed focused piezoelectric transducer is obliquely launched to the rough front surface of the workpiece, and the oblique incident angle is commonly set to 17°. The emitted wave follows the path shown in Figure 2, where the beam passes through the liquid-solid interface, reflects at the vertical side of the surface crack with a depth of h and length of lc, reflects once more the back surface of the workpiece, propagates through the solid-liquid interface, and finally reaches the transducer face. However, the beam could also travel the path in a reversed order, where the beam reflects at the back surface first. The total response from the surface crack comprises the contributions of the reflected waves. Subsequently, setting a point on the vertical side of the crack as (y, z), the total truncated receiving velocity can be defined as Eq. (6) [30].
The velocity response generated on the focused transducer face from the wave that reflects first from the vertical side of the crack can be characterized by a multi-Gaussian beam as Eq. (7).
In the case where the wave reflects first from the back surface, the velocity response of the transducer can be given as Eq. (8).
where, \({\varvec{y}}_{s}\) and \({\varvec{y}}_{b}\) denote the points on the transducer surface corresponding to the point on the vertical side of the micro-crack; \({\varvec{d}}\) represents the polarization vector of the longitudinal wave or shear wave, and \(k_{pm}\), \(k_{sm}\)(m = 1, 2) are the wave numbers for two types of waves in different media; \(A_{r}\) and \(B_{r}\) are the Wen and Breazeale coefficients, respectively. The terms \(T_{12}^{s:p} ,R_{23}^{s:s} ,R_{23}^{s:s} ,T_{34}^{p:s}\) are the transmission and reflection coefficients within the propagation process, and represent the main impact factors containing the surface roughness for the echo responses. The ABCD transfer matrices \({\varvec{M}}_{m}^{p} (z_{n} )\), \({\varvec{M}}_{m}^{s} (z_{n} )\) proposed by Huang et al. [31] can express the propagation, transmission, and reflection of the Gaussian beam.
A system efficiency factor is used to describe the electrical and electromechanical elements in the testing system. It can be calculated by a deconvolution between the frequency-domain response \(V_{0} (\omega )\) and acoustic/elastic transfer function \(t_{A} (\omega )\).
The Wiener Filter is used to reduce the sensitivity of the deconvolution noise, and ε is a constant taken as 0.03.
The RMS heights of the front and back surfaces in Figure 2 are set to \(\sigma_{1}\) and \(\sigma_{2}\). The reflection of the incident wave mainly occurs at the solid-liquid interface of the back surface, and the reflection coefficient \(R_{23}^{s:s}\) can be explicitly presented based on the phase-screen approximation as follows:
The transmission coefficients \(T_{12}^{s:p}\) and \(T_{34}^{p:s}\) on the front surface can be given as Eqs. (11) –(12).
where, \(R_{0}^{s} (\omega ,\theta_{1}^{p} )\), \(T_{0}^{s:p} {(}\omega ,\theta_{1}^{p} {)}\), and \(T_{1}^{p:s} {(}\omega ,\theta_{2}^{s} {)}\) represent the reflection and transmission coefficients under the condition of smooth surfaces, respectively. By substituting Eqs. (10)–(12) into Eqs. (7)–(8), the total velocity response of the transducer surface can be acquired. Subsequently, the frequency-domain response of the transducer for micro-cracks under the effects of a rough surface can be modeled from Eq. (6), in combination with the system efficiency factor from Eq. (9).
3.2 Validation and Comparison between Analytical Model and Simulation Model
3.2.1 Simulation Model and Validation of Analytical Model
The finite element method can efficiently analyze elastic wave scattering, including that involving a multiple-physics coupled field [32]. Numerical models have been established to detect wall thinning and defects from corroded surfaces using ultrasonic guided waves [33], and to investigate the wave scattering on rough interfaces [34].
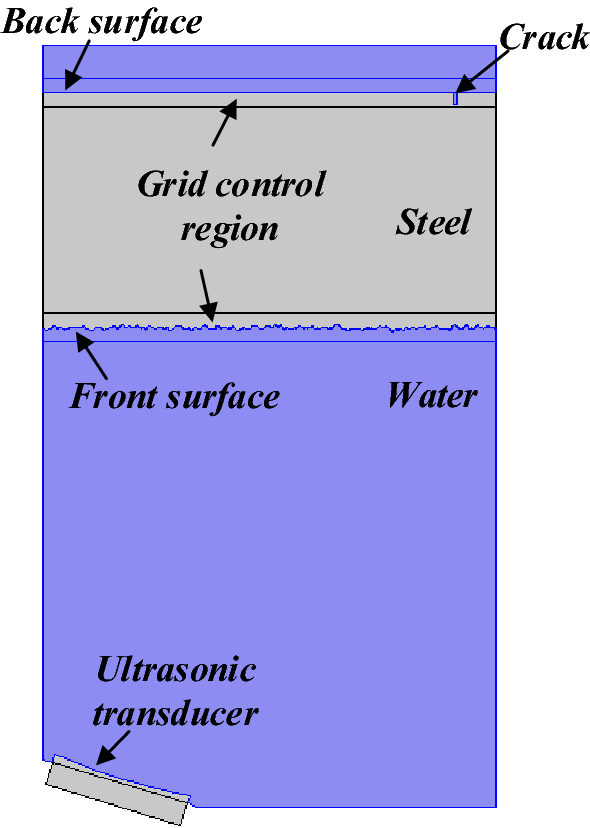
In this study, a two-dimensional simulation model for the ultrasonic inspection of micro-cracks containing rough surfaces was established to acquire the echo response, as shown in Figure 3. The model consisted of a virtual focused transducer, water, and a steel plate with a thickness of 10 mm. The piezoelectric focused transducer was formed by a wafer and arc lens, and was 6 mm in diameter and 25 mm in length. The coupled water thickness was 20 mm, and the incident angle of the pressure wave was 17°. The velocity of the longitudinal wave in water was 1480 m/s, and that of the shear wave in steel was 3230 m/s. A broadband modulated pulse as an excitation signal was applied to an external circuit. The signal can be expressed as Eq. (13).
where, Q denotes the reference amplitude; the center frequency \(f_{0}\) was set to 5 MHz. The values of μ and τ corresponding to the translation and standard deviation were \(1/f_{0}\) and \(1/2f_{0}\), respectively.
The solid-liquid interfaces, including the front surface, back surface, and arc lens surface in the simulation model, were set as acoustic-structure coupled boundaries. The other boundaries were set as radiation boundaries in the water region and low-reflection boundaries in the solid region. Several grid control regions were intensively meshed near the rough surfaces and micro-cracks to improve the calculation accuracy. The grid density was eight elements per wavelength in the control region and six elements in other regions. The random rough surfaces generated as described in Section 2.1, which tend to have a Gaussian distribution, were imported into the simulation model.
A cylindrical reference reflector was used to replace the steel plate in Figure 3 to establish an ultrasonic immersion testing model, and to acquire the system efficiency factor. The parameters of the focused transducer, coupled water, and workpiece were consistent with the simulation model for the micro-crack. A smooth surface was used as the front surface of the reference reflector, and the echo signal is presented in Figure 4a. Figure 4b further shows the system efficiency factor as obtained from the deconvolution reference signal according to Eq. (9). Taking a back-surface micro-crack with a depth of 0.5 mm as an example, the back and front surfaces were set to be smooth. The echo responses acquired from the simulation and analytical models are shown in Figure 4c. It can be seen that the waveform and amplitude of the predicted signal of the micro-crack are similar to those of the simulated response. The simulated signal is slightly larger than the predicted response, and the amplitude difference is 0.8 dB. Therefore, the analytical response of the ultrasonic testing model for the micro-cracks was considered as consistent with the simulation results.
3.2.2 Comparison under Different Rough Surfaces
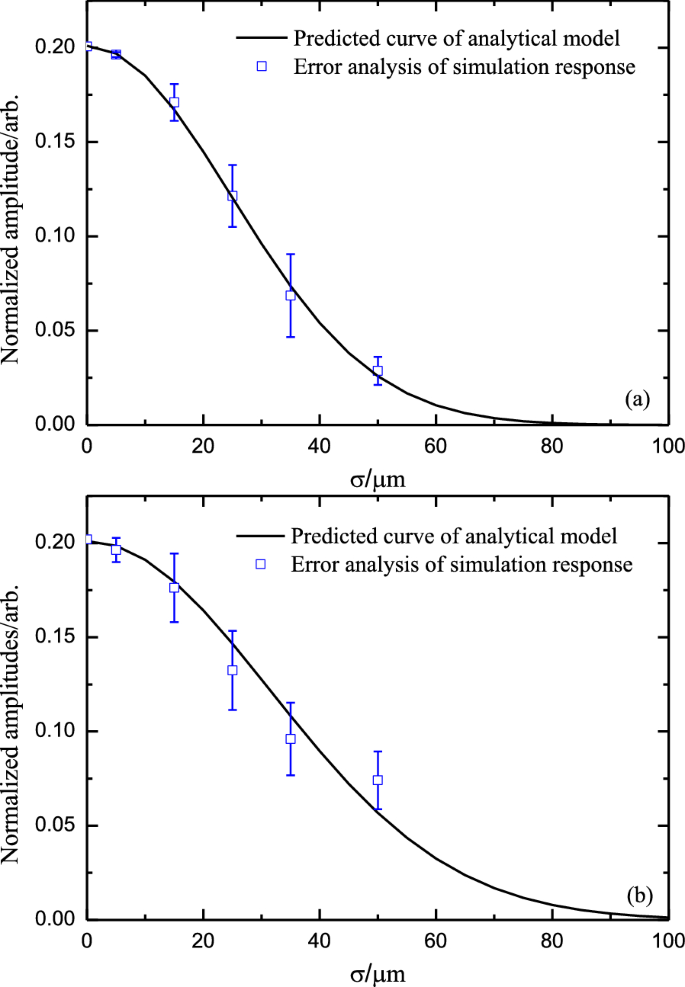
The above analysis validated the consistency between the analytical model and numerical simulation. The microtopography fluctuations of the rough surfaces in accordance with the Gaussian distribution showed randomness; hence, it was necessary to verify the reasonability of the ultrasonic testing model for micro-cracks under the effects of rough surfaces. A back-surface micro-crack with depth of 0.5 mm was consistently used to obtain the echo responses under different surface roughness values. The back surface was initially set to a smooth surface, and the RMS heights of random rough front surfaces were set to 0 μm, 5 μm, 15 μm, 25 μm, 35 μm, and 50 μm, respectively. In another case, the front surface was alternatively smooth, whereas the range for the RMS height values of the rough back surfaces was the same as that of the first condition. Ten simulated signals corresponding to each RMS height were computed for comparison with the predicted response for the micro-crack from the ultrasonic testing model.
Figure 5a shows the amplitude variation of the simulation responses and predicted curve of the analytical model for the back-surface micro-crack under different front surface roughness values. The amplitudes of the micro-crack acquired from the analytical model and numerical simulations, as normalized by the echo signal from the smooth front surface, decrease nonlinearly with an increase in the RMS height. The mean values of the simulated amplitudes are in good agreement with the predicted results from the ultrasonic testing model for the rough front surfaces, and the error between the two responses is within 0.9 dB. The simulated results are also consistent with the predicted curve for the rough back surface, and the maximum error between the mean value of the simulated amplitudes and predicted responses is 2.3 dB, as shown in Figure 5b. Therefore, it can be observed that the ultrasonic immersion testing model can accurately and rapidly calculate the echo responses of micro-cracks under rough surface conditions.
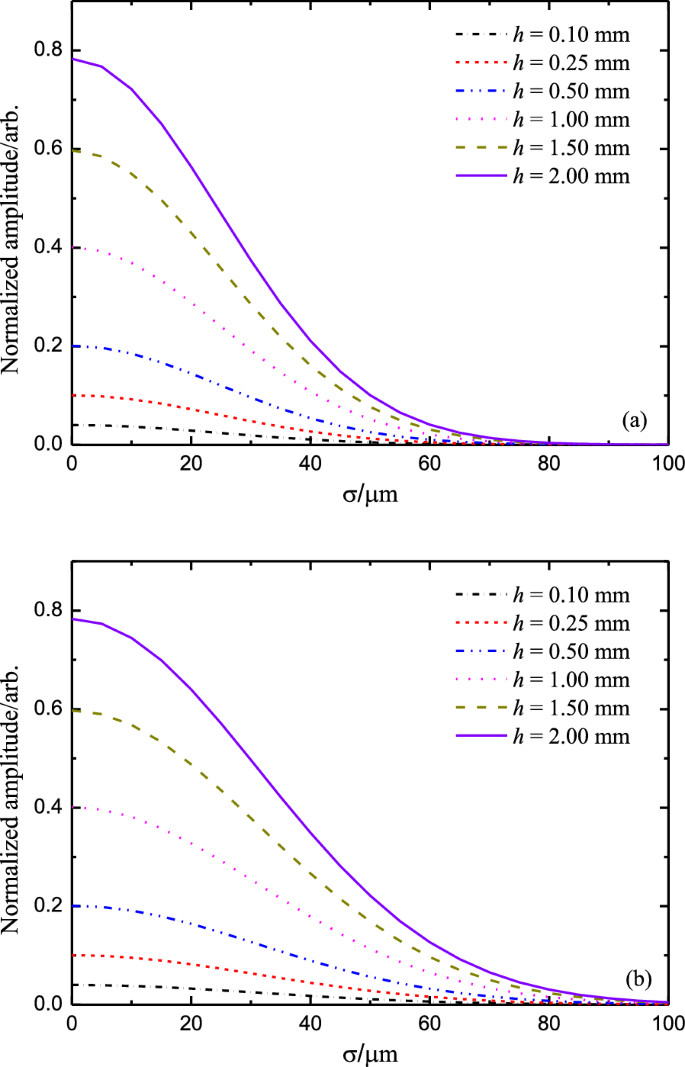
Furthermore, the roughness-modified ultrasonic testing model was applied to acquire the echo signals of micro-cracks at different depths under rough surfaces. The depths of the back-surface cracks were set to 0.10 mm, 0.25 mm, 0.50 mm, 1.00 mm, 1.50 mm, and 2.00 mm, respectively. The RMS heights of the rough surfaces changed from 0 μm to 100 μm. Figure 6a presents the predicted responses of the different cracks under the rough front surface and smooth back surface. The results indicate that the normalized amplitudes are evidently reduced with increasing roughness, and the change trend remains consistent with the wave scattering condition on a rough surface. Similarly, the predicted signals for these cracks under the rough back surface decrease nonlinearly as the roughness increases, as shown in Figure 6b. It can be observed that the influence of both rough surfaces (with a roughness of less than 15 μm) on the echo signal amplitude is insignificant. However, the corresponding RMS height of the front surface is 37 μm when the amplitudes are attenuated by 10 dB, whereas the RMS height of the rough back surface is 48 μm. It can be seen that the effect of the rough front surface on the micro-crack detection is more significant than that of the rough back surface; this is owing to the greater attenuation of the multiple transmissions of pressure waves than in the reflection process.
3.3 Evaluation Method for Detection Accuracy for Micro-crack
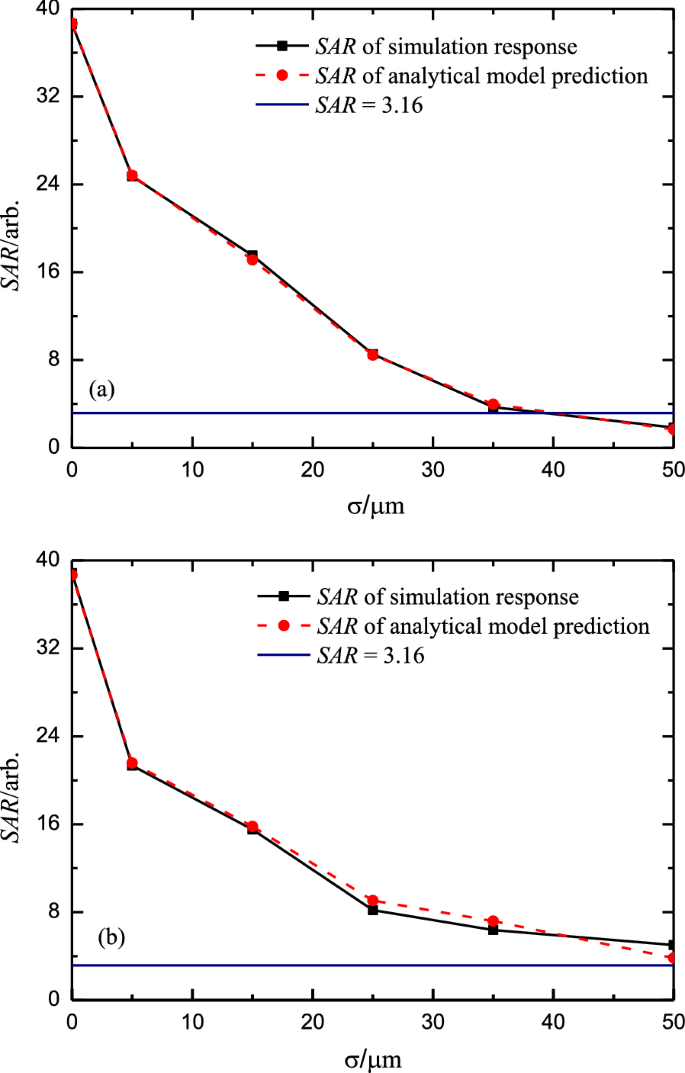
The distortion of the time-domain signal of a micro-crack as caused by the roughness-induced attenuations of the coherent transmission and reflection waves can be clearly observed. The signal-to-noise ratio of a defect response is normally used to evaluate the detectability of ultrasonic testing instruments or equipment, and the critical value should be larger than 10 dB to clearly differentiate between defect signals and noise. For convenience of description of the signal-to-noise ratio, a scalar parameter SAR is directly defined by the ratio of the defect signal amplitude \(\overline{{A_{s} }}\) to the noise amplitude \(\overline{{A_{n} }}\) from the simulation or experiment, which can be expressed as Eq. (14) [26]. The value of SAR equals 3.16 when the signal-to-noise ratio reaches 10 dB.
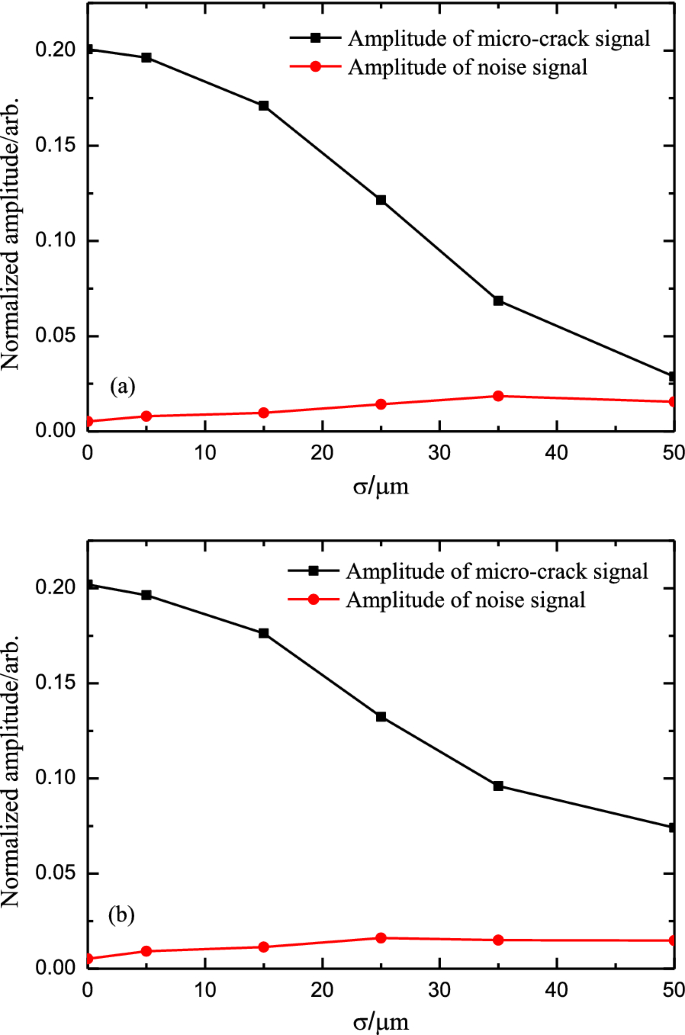
A previous study on internal delamination detection under the influence of roughness showed that the noise amplitude is independent of the defect size [26]. Hence, a micro-crack with a 0.5 mm depth continues to be utilized to calculate the mean amplitudes of noise from multiple simulations. Figure 7a reveals that the noise amplitudes only slightly increase with an increase in roughness. Meanwhile, the change trends of the noise amplitudes under the rough back surface remain similar to those of the rough front surface, as shown in Figure 7b. Furthermore, the SAR values corresponding to the pulse-echo responses from the simulation and analytical models are obtained for different roughness values of the front and back surfaces, as shown in Figure 8a and b. It can be observed that the predicted responses are consistent with the numerical simulation results. Therefore, the signal-to-noise ratios of the different micro-cracks can be acquired from the roughness-modified ultrasonic testing model.
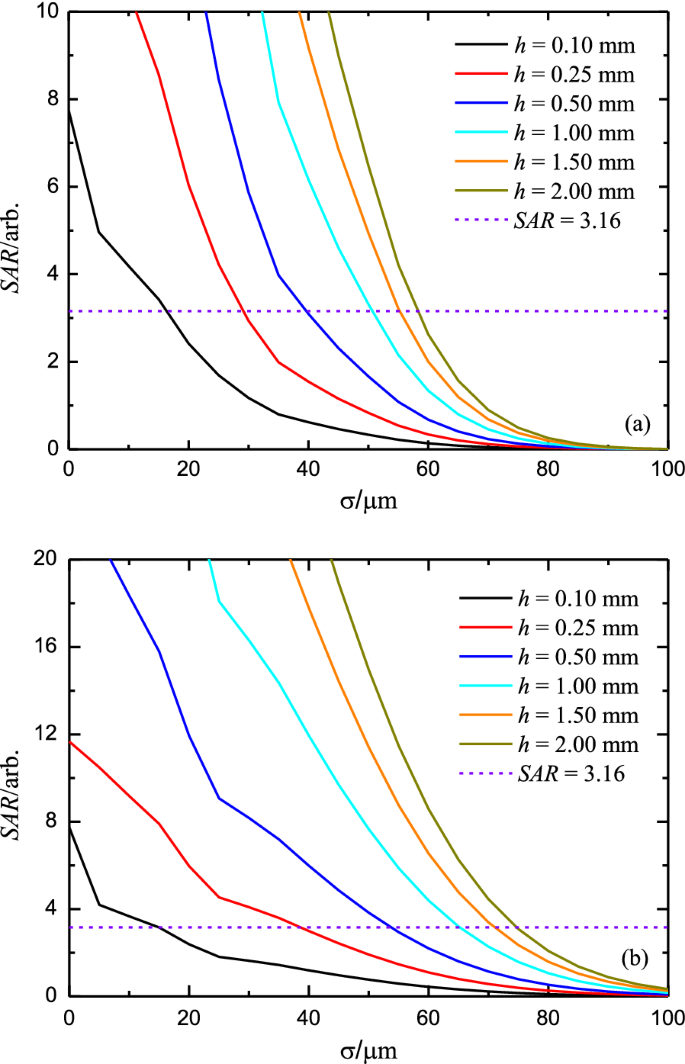
Consequently, the mean noise amplitude can be acquired by interpolation for each surface roughness, owing to the slight variation in the mean amplitude of the noise signal as calculated from the ultrasonic simulation. Then, a method can be proposed for predicting and evaluating the detection accuracy of micro-cracks under rough surfaces by combining the numerical simulations and analytical model. Several cracks with depths of 0.1 mm, 0.25 mm, 0.50 mm, 1.00 mm, 1.50 mm and 2.00 mm were taken as examples to analyze the evaluation method. Figure 9a shows the amplitude ratio factor SAR values of these cracks under the rough front surface as computed by the ultrasonic immersion testing model. Notably, the SAR values decrease with increasing roughness, and the corresponding critical RMS heights are 16, 29, 40, 51, 55, and 58 μm, respectively, when the SAR value reaches 3.16.
In addition, the changes in the amplitude ratio factor for the different cracks under the effect of rough back surfaces were investigated, and are presented in Figure 9b. The critical RMS heights for these cracks are 15, 38, 54, 65, 71, and 75 μm. Evidently, the change trends between the two rough surfaces are comparable. Moreover, the acoustic attenuation induced by the rough front surface is more intense than that induced by the rough back surface, indicating that transmission gives rise to more wave scattering than reflection. In general, the ultrasonic detection accuracy for the micro-cracks can be accurately and rapidly predicted by the proposed evaluation method. The reasonable detection sensitivity of the ultrasonic immersion testing can be developed according to the micro-crack depth limitation as predicted by the evaluation method under practical surface conditions.
4 Experimental Validation of Evaluation Method
4.1 Samples with Rough Surfaces and Experimental Setup
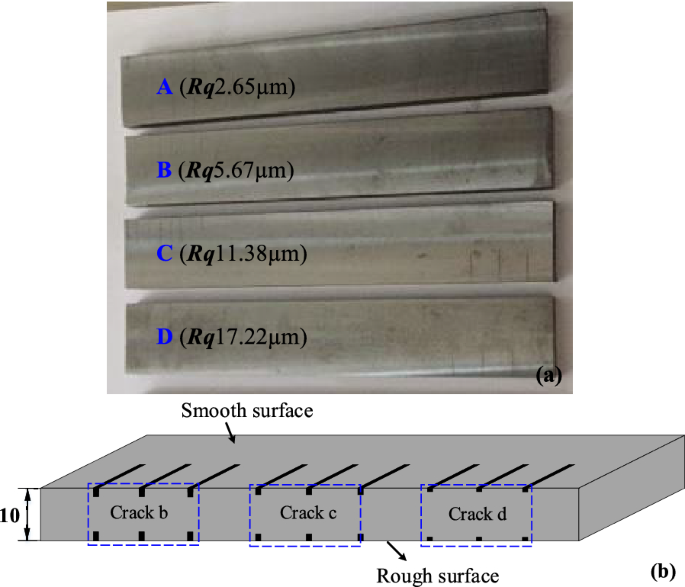
Experiments were designed and implemented to verify the validation of the evaluation method in terms of its prediction of detection accuracy under rough surfaces for micro-cracks. Figure 10a shows several samples with surface micro-cracks at different depths. The sample material was 45# steel with dimensions of 250 mm × 60 mm × 10 mm. One of the surfaces of each sample was grinded to provide a smooth reference surface with an RMS height of 1.58 μm, and the roughness of the opposite surface changed in the order of 2.65, 5.67, 11.38, and 17.22 μm, as processed by wire cut electrical discharge machining. The correlation lengths of these rough surfaces were measured as close to 300 μm using an instrument (PRSR200). The samples were conveniently denoted as A, B, C, and D.
Several micro-cracks with a length of 25 mm and width of 0.15 mm were machined on both the reference surface and rough surface using computer-numerical control electrical discharge machining carving technology. The micro-cracks were named cracks b, c, and d, and their corresponding depths were 0.10 mm, 0.15 mm, and 0.25 mm, respectively, as shown in Figure 10b. The three micro-cracks appearing on each side corresponding to each depth were processed to reduce the uncertainty in the random surface microtopography. An experimental system similar to the ultrasonic immersion testing model was established to measure the time-domain signals of micro-cracks with a line-focused transducer. The diameter of the transducer (with a nominal center frequency of 5 MHz) was 6 mm, and the focal length was 25 mm. A pressure wave was obliquely incident in the samples at a 17° angle and a 20 mm water path from the transducer surface. An ultrasonic testing instrument (CTS-5041) was used to observe the time-domain signals (A-scan) of the artificial defects.
4.2 Samples with Rough Surfaces and Experimental Setup
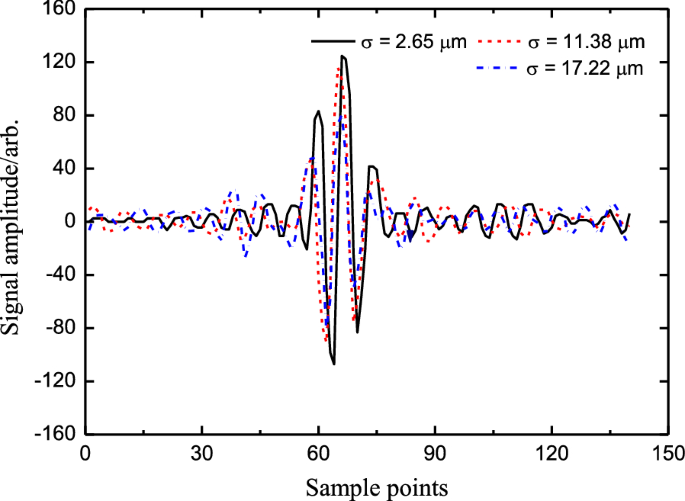
The time-domain signals (A-scan) of artificial micro-cracks were obtained by an ultrasonic excitation and receiving system. Figure 11 shows the experimental signals of the micro-cracks with the 0.15 mm depth under the condition of a smooth back surface and rough front surfaces for samples A, C, and D. The amplitudes of the defect signals decrease with an increase in roughness, and the noise amplitudes remain almost constant, consistent with the simulation results discussed in Section 3.3.
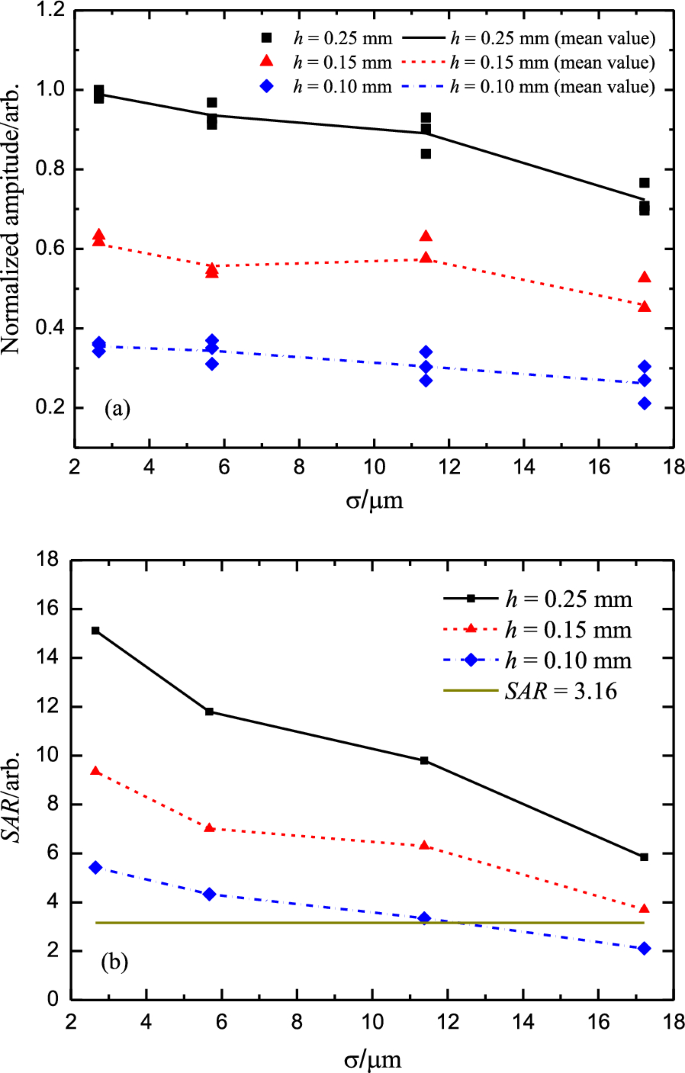
The effect of the front surface roughness on the detection of the back-surface micro-cracks was investigated first. The normalized amplitudes and mean values of the micro-cracks under the rough front surface and smooth back surface were acquired, and are presented in Figure 12a. The rough surfaces, even with the same statistical parameter, can cause differences in the shapes and amplitudes of the echo signals. The experimental results are consistent with the analytical model predictions for the amplitude change trends of the different micro-cracks. The SAR values of these artificial defects decrease monotonically with increasing roughness, as shown in Figure 12b. The critical RMS height of front surface is approximately equal to 12.5 μm when the SAR value reaches 3.16 for the micro-crack with depth of 0.10 mm; this is close to the predicted results for 16 μm in Figure 9a.
The normalized amplitudes and experimental SAR values of the micro-cracks corresponding to the rough back surface and smooth front surface are shown in Figure 13a and b. The change trends are similar to those of the rough front surface. The critical roughness of the back surface approaches 14.5 μm for the micro-crack with a depth of 0.10 mm; this close to the predicted results for 15 μm in Figure 9b. Moreover, it can be clearly observed that the signal-to-noise ratios of the micro-cracks under the effect of the rough back surface are larger than those under the rough front surface. Overall, the experimental analyses are consistent with the analytical evaluation method.
5 Conclusions
The main objective of this work is to explore a method for evaluating the detection accuracy of micro-cracks under the effects of rough surfaces.
-
(1)
The RMS height of the surface microtopography in the normal direction plays a dominant role in the echo signal amplitude and waveform of the back-surface micro-crack, as acquired by a transducer with a 5 MHz frequency and 6 mm diameter under the general rough surface parameters of a steel material.
-
(2)
A roughness-modified ultrasonic immersion testing model for micro-cracks is established based on the multi-Gaussian beam model and phase-screen approximation principle. The related transmission and reflection coefficients at the rough solid-liquid interface are provided to facilitate the use of the analytical model.
-
(3)
By incorporating the simulation model for the reference reflector, the echo signals of micro-cracks corresponding to different roughness values of the front and back surfaces can be predicted by the roughness-modified ultrasonic testing model. The amplitude of the echo signal decreases nonlinearly with increasing roughness, and the noise amplitude remains almost constant.
-
(4)
The effect of a rough front surface on the echo response of a micro-crack is evidently larger than that of a rough back surface. When the RMS height of the rough front or back surface is less than 15 μm, it has no significant influence on the ultrasonic detection accuracy for a line-focused transducer with a center frequency of 5 MHz and a diameter of 6 mm.
-
(5)
The detection accuracy for micro-cracks can be efficiently estimated based on the finite element simulation and analytical model. The experimental results show good consistency with the predictions from the evaluation method.
The next research scheduled aims to compensate for the detection sensitivity for the micro-cracks on the back surface or front surface based on the evaluation method during a large-area automatic ultrasonic detection.
References
M Ducousso, F Reverdy. Real-time imaging of microcracks on metallic surface using total focusing method and plane wave imaging with Rayleigh waves. NDT & E International, 2020: 102311.
J W Cheng, J N Potter, A J Croxford, et al. Monitoring fatigue crack growth using nonlinear ultrasonic phased array imaging. Smart Materials and Structures, 2017, 26(5): 1-10.
R K Rachev, P D Wilcox, A Velichko, et al. Plane wave imaging techniques for immersion testing of components with non-planar surfaces. IEEE Transactions on Ultrasonics, Ferroelectrics, and Frequency Control, 2020, 67(7): 1303-1316.
F X Zou, F B Cegla. High-accuracy ultrasonic corrosion rate monitoring. Corrosion, 2017, 74(3): 372-382.
C A Chua, P Cawley, P B Nagy. Scattering of the fundamental shear guided wave from a surface-breaking crack in plate-like structures. IEEE Transactions on Ultrasonics, Ferroelectrics, and Frequency Control, 2019, 66(12): 1887-1897.
Y F Song, XB Li, YW Shi, et al. Effects of surface roughness on diffuse ultrasonic backscatter in the solids. Acta Physica Sinica, 2016, 65(21): 214301. (in Chinese)
J R Pettit, A E Walker, M J S Lowe. Improved detection of rough defects for ultrasonic nondestructive evaluation inspections based on finite element modeling of elastic wave scattering. IEEE Transactions on Ultrasonics, Ferroelectrics, and Frequency Control, 2015, 62(10): 1797-1808.
D E Chimenti, O I Lobkis. The effect of rough surfaces on guided waves in plates. Ultrasonics, 1998, 36(1): 155-162.
S F Burch, N Collett, R K Chapman, et al. Experimental validation of the TRANGLE and related NDT codes for modelling the ultrasonic inspection of rough cracks. Insight-Non-Destructive Testing and Condition Monitoring, 2004, 46(2): 74-76.
F Shi, M J S Lowe, R V Craster. Recovery of correlation function of internal random rough surfaces from diffusely scattered elastic waves. Journal of the Mechanics and Physics of Solids, 2017, 99: 483-494.
E I Thorsos, D R Jackson. The validity of the perturbation approximation for rough surface scattering using a Gaussian roughness spectrum. Journal of the Acoustical Society of America, 1989, 86(1): 261-277.
J A Ogilvy. Theoretical comparison of ultrasonic signal amplitudes from smooth and rough defects. NDT International, 1986, 19(6): 371-385.
J Zhang, B W Drinkwater, P D Wilcox. Longitudinal wave scattering from rough crack-like defects. IEEE Transactions on Ultrasonics, Ferroelectrics, and Frequency Control, 2011, 58(10): 2171 - 2180.
F Shi, M J S Lowe, R V Craster. Diffusely scattered and transmitted elastic waves by random rough solid-solid interfaces using an elastodynamic Kirchhoff approximation. Physical Review B, 2017, 95(21): 214305.
M Lian, H B Liu, L Zhou, et al. Ultrasonic roughness measurement based on scattering attenuation. Surface Topography: Metrology and Properties, 2019, 7(1): 015001.
J Ye, H Kim, S Song, et al. The far-field scattering response of a side drilled hole in single/layered anisotropic media in ultrasonic pulse-echo setup. Wave Motion, 2011, 48(3): 275-289.
X Y Zhao, T Gang. Nonparaxial multi-Gaussian beam models and measurement models for phased array transducers. Ultrasonics, 2009, 49(1): 126-130.
H Jeong, L W Schmerr Jr. Ultrasonic transducer fields modeled with a modular multi-Gaussian beam and application to a contact angle beam testing. Research in Nondestructive Evaluation, 2008, 19(2): 87-103.
H J Kim, S Song, L W Schmerr Jr. Modeling ultrasonic pulse-echo signals from a flat-bottom hole in immersion testing using a multi-Gaussian beam. Journal of Nondestructive Evaluation, 2004, 23(1): 11-19.
Z X Lu, C G Xu, D G Xiao, et al. Nondestructive testing method for curved surfaces based on the multi-Gaussian beam model. Journal of Nondestructive Evaluation, 2015, 34(4): 1-9.
D Benstock, F Cegla, M Stone. The influence of surface roughness on ultrasonic thickness measurements. Journal of the Acoustical Society of America, 2014, 136(6): 3028-3039.
A Jarvis, F Cegla. Scattering of near normal incidence SH waves by sinusoidal and rough surfaces in 3-D: Comparison to the scalar wave approximation. IEEE Transactions on Ultrasonics, Ferroelectrics, and Frequency Control, 2014, 61(7): 1179-1190.
J Dobson, P Cawley. The scattering of torsional guided waves from Gaussian rough surfaces in pipework. Journal of the Acoustical Society of America, 2017, 141(3): 1852-1861.
P B Nagy, J H Rose. Surface roughness and the ultrasonic detection of subsurface scatterers. Journal of applied physics, 1993, 73(2): 566-580.
J L Rose. Ultrasonic Waves in Solid Media. New York: Cambridge University Press, 1999.
Z Wang, J W Cheng. Numerical and analytical study for ultrasonic testing of internal delamination defects considering surface roughness. Ultrasonics, 2020, 110: 106290.
H J Kim, J Park, S Song, et al. Modeling angle beam ultrasonic testing using multi-Gaussian beams. Journal of Nondestructive Evaluation, 2004, 23(3): 81-93.
H J Kim, S J Song, L W Schmerr Jr. An ultrasonic measurement model using a multi-Gaussian beam model for a rectangular transducer. Ultrasonics, 2006, 44: e969-e974.
Z Wang, H M Pu, Y H Kang, et al. Nondestructive testing method and application for internal defect of metal balls. Nondestructive Testing and Evaluation, 2020, 35(2): 177-189.
L W Schmerr Jr., S J Song. Ultrasonic Nondestructive Evaluation Systems. New York: Springer, 2007.
R J Huang, L W Schmerr Jr., A Sedov. Multi-Gaussian ultrasonic beam modeling for multiple curved interfaces—an ABCD matrix approach. Research in Nondestructive Evaluation, 2005, 16(4): 143-174.
J R Pettit, A E Walker, M J S Lowe. Improved detection of rough defects for ultrasonic NDE inspections based on finite element modeling of elastic wave scattering. AIP Conference Proceedings, 2014, 1581(33): 521-528.
P Khalili, P Cawley. The choice of ultrasonic inspection method for the detection of corrosion at inaccessible locations. NDT & E International, 2018, 99: 80-92.
F Shi, M J S Lowe, X Xi, et al. Diffuse scattered field of elastic waves from randomly rough surfaces using an analytical Kirchhoff theory. Journal of the Mechanics and Physics of Solids, 2016, 92: 260-277.
Acknowledgements
Not applicable.
Funding
Supported by the Key Research and Development Plan of Anhui Province (Grant No. 202004a05020003), Anhui Provincial Natural Science Foundation (Grant Nos. 2008085QE233, 2008085J24), the Science and Technology Major Project of Anhui Province (Grant No. 201903a05020010) and the Doctoral Science and Technology Foundation of Hefei General Machinery Research Institute (Grant No. 2019010383).
Author information
Authors and Affiliations
Contributions
XC and ZF were in charge of the whole trial; ZW constructed the simulation model, implemented the experiments and wrote the manuscript; YK helped establish the analytical model; JC and WC assisted with sampling and laboratory analyses. All authors read and approved the final manuscript.
Authors’ Information
Zhe Wang, born in 1991, is currently an assistant research fellow at Hefei General Machinery Research Institute Co., Ltd., China. He received his BSc and PhD from School of Mechanical Science & Engineering at Huazhong University of Science and Technology, China, in 2013 and 2019, respectively. His research interests include nondestructive testing technology and instrumentation development, such as piezoelectric/electromagnetic ultrasonic inspection.
Zhichao Fan, born in 1974, is currently a research fellow at Hefei General Machinery Research Institute Co., Ltd., China. He received his PhD degree on chemical engineering and machinery in Zhejiang University, China, in 2004.
Xuedong Chen, born in 1964, is currently an Academician of Chinese Academy of Engineering at Hefei General Machinery Research Institute Co., Ltd., China. He received his PhD degree on chemical engineering and machinery in Zhejiang University, China, in 2004.
Yihua Kang, born in 1965, is currently a professor at Huazhong University of Science and Technology, China. He received his PhD degree from Huazhong University of Science and Technology, China, in 1993. His research interests include nondestructive testing technology and instrumentation.
Jingwei Cheng, born in 1993, is currently an assistant research fellow at Hefei General Machinery Research Institute Co., Ltd., China. He received his PhD degree from Bristol University, UK, in 2018. His research interests include nondestructive testing technology and instrumentation.
Wei Chen, born in 1980, is currently a senior engineer at Hefei General Machinery Research Institute Co., Ltd., China. His main research interests include risk-based inspection of petrochemical installations.
Corresponding author
Ethics declarations
Competing Interests
The authors declare no competing financial interests.
Rights and permissions
Open Access This article is licensed under a Creative Commons Attribution 4.0 International License, which permits use, sharing, adaptation, distribution and reproduction in any medium or format, as long as you give appropriate credit to the original author(s) and the source, provide a link to the Creative Commons licence, and indicate if changes were made. The images or other third party material in this article are included in the article's Creative Commons licence, unless indicated otherwise in a credit line to the material. If material is not included in the article's Creative Commons licence and your intended use is not permitted by statutory regulation or exceeds the permitted use, you will need to obtain permission directly from the copyright holder. To view a copy of this licence, visit http://creativecommons.org/licenses/by/4.0/.
About this article
Cite this article
Wang, Z., Fan, Z., Chen, X. et al. Modeling and Experimental Analysis of Roughness Effect on Ultrasonic Nondestructive Evaluation of Micro-crack. Chin. J. Mech. Eng. 34, 114 (2021). https://doi.org/10.1186/s10033-021-00637-5
Received:
Revised:
Accepted:
Published:
DOI: https://doi.org/10.1186/s10033-021-00637-5
