- Original Article
- Open access
- Published:
Sheet Bulk Forming of Thin-Walled Components with External Gearing through Upsetting Using Controllable Deformation Zone Method
Chinese Journal of Mechanical Engineering volume 34, Article number: 138 (2021)
Abstract
Sheet-bulk metal forming (SBMF) is a promising process for manufacturing complex sheet components with functional elements. In this study, the entire forming process for a typical thin-walled component with external gearing is investigated, including sheet forming and bulk forming processes. Deep drawn cups are prepared during sheet forming; subsequently, upsetting is performed on the sidewall to form external gearing. The upsetting method performed is known as upsetting with a controllable deformation zone (U-CDZ). Compared with the conventional upsetting method, a floating counter punch with a counter force is used in the U-CDZ method such that the forming mechanism is changed into the accumulation of the deformation zone instead of deformation throughout the entire sidewall. The effects of the counter force and material flow are investigated to understand the mechanism. The forming quality, i.e., the formfilling and effective strain distribution, improved, whereas a high forming load is avoided. In addition, a punch with a lock bead is used to prevent folding at the inner corner during the experiment.
1 Introduction
Lightweight strategies can be used to create environmentally friendly products with low energy consumption and gas emissions, particularly in the transportation sector. As mentioned by Tekkaya et al. [1], the integration of functional elements is one of the most effective methods for realizing lightweight structures. Higher demands for the net-shape forming of thin-walled components with increasing complexity have been posed, e.g., gear drums and synchronizer rings. Hence, the application of bulk forming operations on sheet metals in combination with sheet forming processes, known as sheet-bulk metal forming (SBMF) or plate forging, has been proposed.
As reviewed by Merklein et al. [2] and Mori and Nakano [3], the SBMF method can shorten the process chain and improve material utilization when manufacturing functional components. Maeda and Araki [4] developed a typical three-stage forming process for manufacturing circumferential gearing at the outer edge of a circular blank; the process comprised deep drawing, flanging, and upsetting. Nakano [5] explained that compared with conventional bar forging, plate forging offers more advantages for producing shell components with complicated cross-sectional shapes. Schneider and Merklein [6] developed a single-stage process combining deep drawing and upsetting, which extended the application of the SBMF method to the manufacturing of thin-walled components. Meanwhile, Isik et al. [7] discovered that the void volume fraction decreased after SBMF, and better mechanical properties were obtained.
Even though SBMF offers significant advantages, it presents challenges including buckling, folding [8], and high forming loads. Hence, significant efforts have been expended, such as the use of tailored blanks, tailored surfaces, and vibration-assisted loading mode. In a study by Merklein et al. [9], a tailored blank produced via orbital forming was used as a semi-finished component to manufacture a geared component. Consequently, grooving and folding were eliminated. Opel et al. [10] presented flexible rolling to perform a tailored blank, thereby increasing material utilization and mold filling. Another method to optimize mold filling and geometric accuracy is to customize the tribological conditions, which directly affect the material flow. Merklein et al. [11] investigated material flow in the gear extrusion process and reported that insufficient filling is inevitable when using conventional tooling systems. Löffler et al. [12] investigated the effectiveness of locally adapted tribological conditions, and the experimental results showed that the maximum height of the functional elements increased by at least 10%. In addition to using tailored surfaces, material flow can be improved via specific ram motions of the press. Maeno et al. [13, 14] reported that the application of load pulsation to plate compression improved the lubrication conditions for producing a product with better dimensional accuracy. Similarly, Behrens et al. [15,16,17] developed a hydraulic actuator to superimpose oscillation on a combined ironing and external gearing forming process to achieve better forming quality. Meanwhile, Behrens et al. [18] discovered that for sheet components with inner and external gearing, a die with lock bead can successfully avoid inner forging laps when upsetting the sidewall. Moreover, to reduce the forming load, Sieczkarek [19, 20] developed an innovative incremental SBMF process to form an external gearing component, and then extended its application to the formation of hybrid gear components [21]. Subsequently, Wernicke [22,23,24] optimized the tool structure and performed additive heating to enhance the formability of components; however, unfilling, folding, and cracking persisted.
To manufacture thin-walled components with functional elements in more accurately and efficiently, an alternative SBMF method was used in this study. The compound forming process included two stages: the sheet-forming stage and bulk-forming stage. In the former stage, a cup preform is produced via blanking, deep drawing, sizing, and cutting. Subsequently, in the latter stage, upsetting with a controllable deformation zone (U-CDZ) is performed to form external gearing on the cup sidewall. The entire process chain was verified experimentally. The effect of deep drawing was investigated, and a lock bead was adopted to prevent folding at the inner corner. Compared with the conventional forming method, the U-CDZ method resulted in a significant decrease in the forming load, and the formfilling improved. Moreover, numerical studies were conducted to analyze the material flows and effective strain distribution during the forming process.
2 Methodology
2.1 Target Geometry
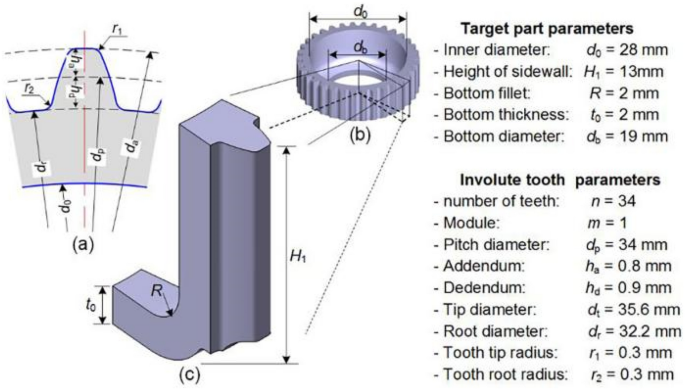
The aim of this study is to fundamentally understand the manufacturing of thin-walled components with functional elements via SBMF. The target geometry, as shown in Figure 1, involves the use of external gearing as a functional element. As shown in Figure 1(b), the inner diameter of the sidewall of the shell components, d0 = 28 mm, and the height of the sidewall was H1 = 13 mm. The diameter of the hole at the bottom, db, was 28 mm. Both the bottom filet (R) and bottom thickness (t0) were 2 mm. In addition, 34 involute teeth were located uniformly and symmetrically at the outer surface of the sidewall. Figure 1(c) presents an enlarged view of a single tooth, and the primary parameters used in this study (nomenclature shown in Figure 1(a)) were as follows: (i) number of teeth (n = 34), module (m = 1), and pitch diameter (dp = 34 mm); (ii) addendum (ha = 0.8 mm) and tip diameter (dt = 35.6 mm); (iii) dedendum (hd = 0.9 mm) and root diameter (dr = 32.2 mm); (iv) tip radius of tooth (r1 = 0.3 mm) and root radius of tooth (r2 = 0.3 mm).
2.2 Process Chain
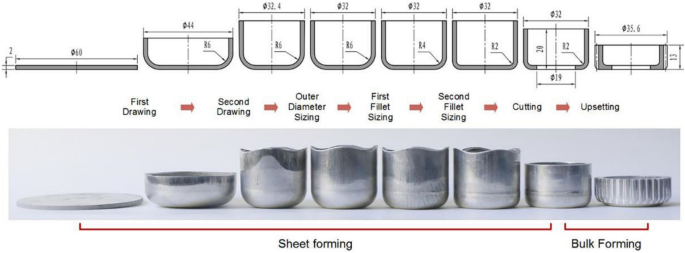
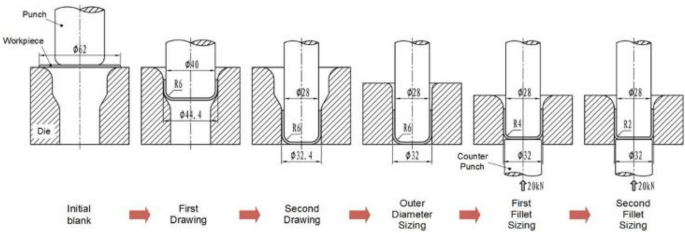
Figure 2 shows the complete process chain designed for the manufacturing of thin-walled cups with external gearing from a blank, and the initial thickness of the blank was 2 mm. The process chain was composed of two stages, which included seven steps.
-
(1)
The first forming stage includes blanking, two-step deep drawing, three-step sizing, and subsequent cutting. The size of the initial billet is determined by the principle of volume constancy, where the drawing ratio is considered simultaneously. After drawing, sizing is performed to obtain an accurate outer diameter and bottom filet.
-
(2)
The second forming stage is upsetting on the sidewall to yield functional elements. The U-CDZ method proposed by Zhu et al. [25], which is the core of the entire process chain, is applied.
2.3 Manufacturing Functional Elements Using U-CDZ Method
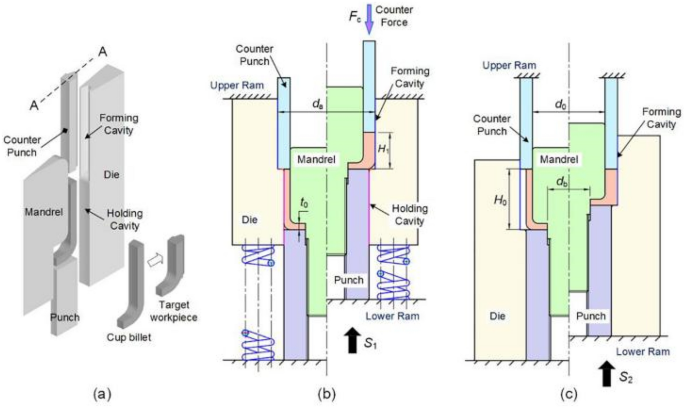
After the sheet forming processes were conducted, a cup-shaped preform was prepared; subsequently, the functional elements were formed via upsetting. Figure 3 shows schematic illustrations of the tool concept and forming before and after the upsetting operation. As shown in Figure 3(a), a deep cup drawn from a sheet blank was installed in a forming system comprising four core components: a punch, counter punch, mandrel, and die. Mandrels and punches were connected by bolts to prevent the bottom from thickening when upsetting was performed on the sidewall. The die contained two cavities, i.e., a forming cavity and a holding cavity. An internal gearing cavity was present in the forming cavity.
Forming principle: (a) digital model, (b) presentation of section A-A based on U-CDZ method, (c) presentation of section A-A of conventional upsetting method (nomenclature based on Figure 1)
The second forming stage, i.e., upsetting on the sidewall, is crucial to ensure the feasibility of the total SBMF process chain. Therefore, the forming concept of U-CDZ was applied to decrease the forming load and improve the formfilling when upsetting was performed on the sidewall. Figure 3(b) shows the principle of the U-CDZ method. Initially, the cup sidewall was fixed by the mandrel and holding cavity of the die. Owing to the feeding of the punch, more material was pushed into the forming cavity. At this moment, a counter force was applied to the counter punch, which upset the sidewall and resulted in a gearing shape. If the internal force of the workpiece exceeds the counter force, then the counter punch retracts, more space will be available, and more material will be able to flow into the forming cavity and form functional elements incrementally. Hence, using the U-CDZ method, the overall upsetting deformation on the sidewall can be segmented into incremental deformations.
To better understand the principle and advantages of the U-CDZ method, an illustration of the conventional upsetting operation is presented in Figure 3(c). The total sidewall was installed in the forming cavity. The counter punch and die were fixed, which differs from the U-CDZ method. Owing to the feeding of the punch, the height of the sidewall reduced; consequently, material flowed into the free space of the gearing cavity, causing the cup sidewall to thicken and a tooth shape.
3 Experiment and Simulation
3.1 Material
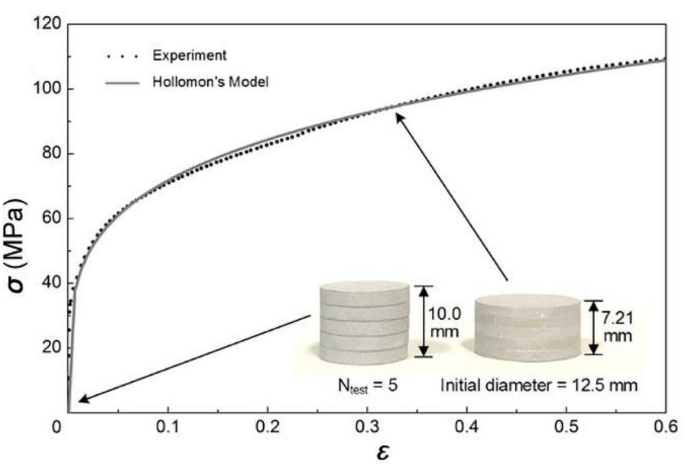
The stack compression test is currently the only reliable mechanical characterization test that can be used to obtain stress–strain curves up to the high values of strain typically observed in SBMF [26]. In this study, 2-mm-thick commercial purity aluminum 1060-O sheets were utilized, the flow curve of which was determined via stack compression tests.
Five discs with a diameter of 12.5 mm and a thickness of 2 mm were piled up. Compression tests were performed on a SANS CMT5305 (MTS) universal testing machine with a strain rate of 0.002 s−1 under a crosshead speed of 1 mm/min. The specimens were pressed at room temperature between two flat-polished, well-lubricated parallel platens. The stress–strain curve obtained from the stack compression tests is shown in Figure 4 and was approximated using Hollomon’s strain hardening model, i.e., σ = 122.6 ε0.233.
3.2 Friction Test
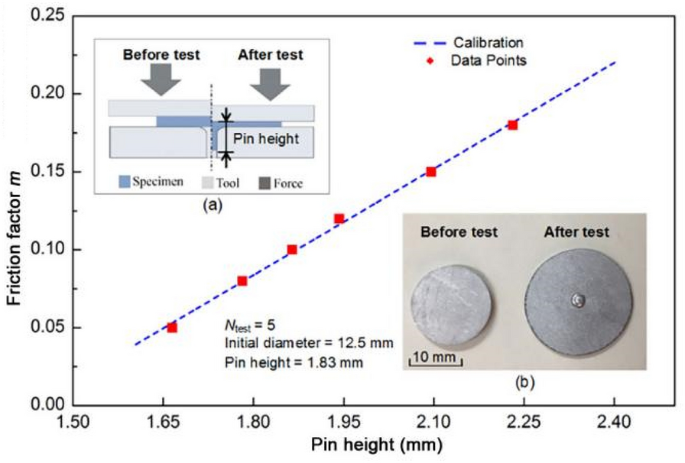
A pin extrusion test was performed to identify the friction factor. As illustrated by Vierzigmann et al. [27], this test combines upsetting and a forward extrusion process, which are typical SBMF operations. The principle of this method is shown in Figure 5(a), where the pin is formed by pressing the upper die on the specimen. A cavity with a diameter of 1.5 mm and a shoulder radius of 1.0 mm is present in the center of the lower die. The higher the friction, the higher is the amount of material flowing into the cavity. Hence, the pin height can be used to identify the friction factor. In this study, specimens with diameter of 15.0 mm and a thickness of 2.0 mm were used. The test was performed using a Komatsu hybrid AC servo press H1F200, and the stroke of the punch was defined as 1.0 mm at a speed of 1 mm/s. The corresponding simulation of the pin extrusion test was performed using TRANSVALOR Forge NXT 1.1. Several friction factors were simulated, and a fitting curve was obtained, as shown in Figure 5. The pin height measured in the experiment was 1.83 mm (as shown in Figure 5(b)), and the friction factor was derived to be 0.09.
Calibration curve of pin extrusion: (a) principle (Vierzigmann et al. [27]) and (b) test results
3.3 Experimental Plan
Based on the dimensional parameters of the target component presented in Figure 1 and the law of volume constancy, the maximum theoretical blank diameter should be 55 mm. However, considering the earring at the top of the cup sidewall owing to the anisotropy of the sheet blanks in the deep drawing process, a subsequent cutting must be performed to obtain a flat end surface on the sidewall. Hence, the blank diameter was enlarged to 62 mm, and the height of the cup sidewall after cutting, H0, was 20 mm (Figure 3). The core parameters used in the sheet forming processes were the same as those used by Zhu et al. [28] for tool design, as illustrated in Figure 6. In the first and second deep drawing, the clearance of the punch and die was 2.2 mm. Subsequently, the clearance was decreased to 2.0 mm during external diameter sizing. After the two-step filet sizing, the inner bottom filet decreased from 6 to 2 mm. Cutting was subsequently performed to obtain a flat end surface on the sidewall and bottom hole to enable the connection of the mandrel and punch.
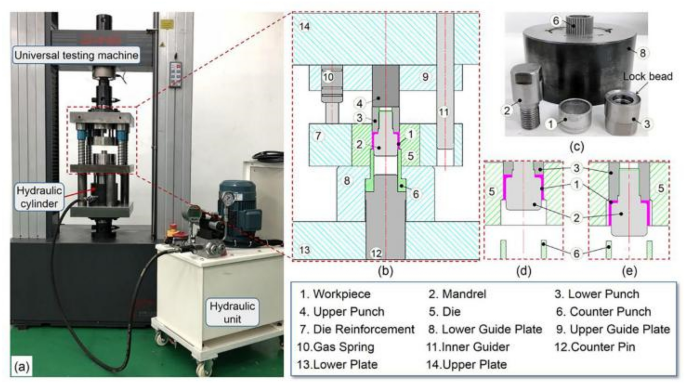
After the cup preform was completed, the sidewall was upset to manufacture the functional elements. As shown in Figure 7(a), the forming equipment includes tooling, a universal testing machine, a hydraulic unit, and a cylinder. Tooling was installed in a SANS CMT5305 (MTS) universal testing machine at a crosshead speed of 1 mm/s. The tooling is schematically shown in Figure 7(b); the primary forming components were the mandrel, punch, counter punch, and die. To realize movement between the forming components, gas springs that can provide a force of 20 kN were employed to fix the die when the upper plate moved downward. A universal testing machine and a hydraulic cylinder were used to drive the punch and counter punch, respectively, where the cylinder provided the required counter force. In this study, the counter force was set to 30, 40, 50, and 60 kN. As shown in Figure 7(c), the mandrel and punch were assembled together using a thread such that the bottom remained unchanged during sidewall upsetting. The punch was optimized by adding a lock bead to prevent inner folding when upsetting the cup sidewall. In addition, Figure 7(d) and (e) present the relative locations of the core forming components yielded by the U-CDZ and conventional upsetting methods, respectively.
In the present study, zinc stearate was used as a lubricant. To determine the effects of the forming parameters, the workpieces from the experiments were scanned using an ATOS core scanning equipment (whose measurement error was 0.01 mm), and three-dimensional STL models were obtained. Some samples were sawed along the center axis and then ground and polished to verify the section formfilling.
3.4 Simulation
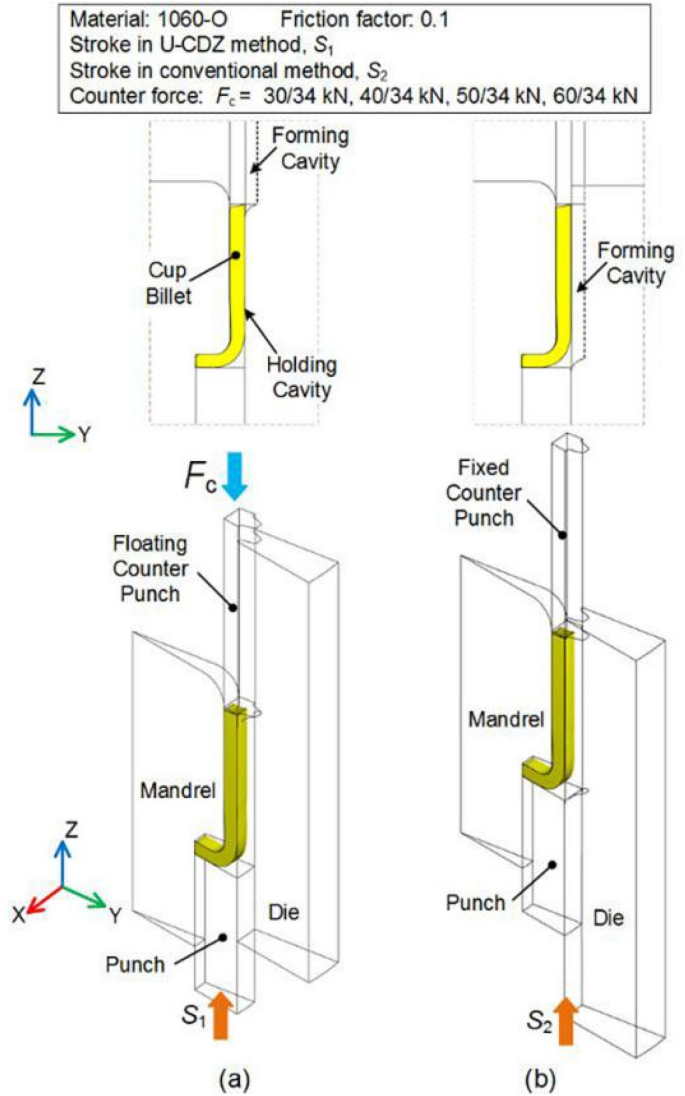
A numerical simulation, is beneficial for investigating the material flow and forming mechanism, was conducted to analyze the feasibility of the new forming processes. Therefore, a series of simulations were performed using a TRANSVALOR Forge NXT 1.1. In this study, all the forming processes, i.e., sheet forming and bulk forming processes, were performed using the three-dimensional (3D) module, and a 1/34 axisymmetric model, which corresponds to the all-process forming of a single gear, was used to reduce the computation amount. Therefore, the counter forces were set as 30/34, 40/34, 50/34, and 60/34 kN. The parameters used in the simulation were consistent with the experimental conditions, as shown in Figure 8. The stroke of the punch in the U-CDZ method was denoted as S1, and in the conventional method, S2.
The core process to determine the forming quality is the bulk forming process, after which a cutting operation is performed to maintain a uniform sidewall height. Therefore, anisotropy was not emphasized in this study.
4 Results and Discussions
4.1 Drawing Behavior
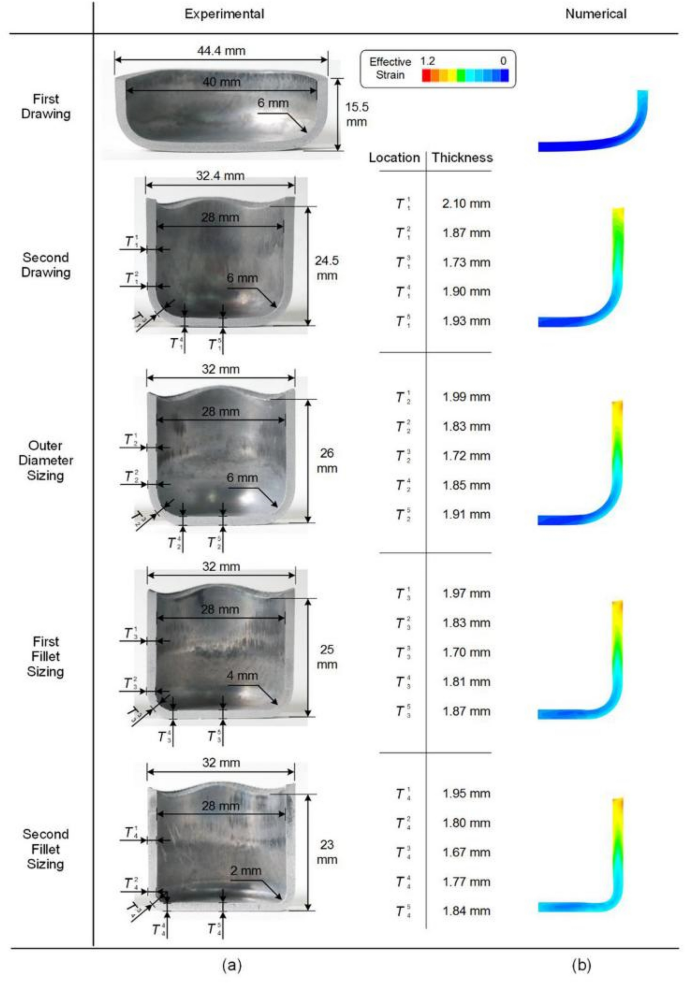
Based on the volume constancy and considering the cutting allowance, discs with a diameter of 62 mm were blanked from the sheet with an initial thickness of 2 mm. The forming results of the vertical cross-section of the specimens along the diameter, including the experimental and numerical results, are illustrated in Figure 9. Five measurement positions were denoted in each section for the detection of wall thickness via optical microscopy. The measuring point was located at the filet. Two measuring points were on the tangency points: the tangent locations of the filet and sidewall, and the tangent locations of the filet and bottom. The remaining two points were set at the middle height of the sidewall and the center of the bottom to observe the drawing results.
The detailed measurement data of the section profile show a varying thickness distribution in the cup during sheet forming. It was confirmed that maximum thinning occurred at the filet owing to bending and tension. After a two-step deep drawing, the thickness at the filet, \(T_{1}^{3}\), decreased from the initial 2 mm to 1.73 mm. The thickness at the bottom center, \(T_{1}^{5}\), decreased slightly to 1.93 mm. The wall thickness increased with the cup height, which is a typical result in deep drawing and governed by the drawing clearance between the punch and die. The thickness at the middle cup wall, \(T_{1}^{1}\), was 2.10 mm. To obtain a uniform sidewall thickness, external diameter sizing was necessary. The sidewall thickness at the middle height, \(T_{2}^{1}\), was shaped to 1.99 mm, and other geometry parameters remained almost unchanged. In the final two steps, filet sizing was performed. The radius decreased from 6 to 4 mm, and then to 2 mm. Finally, it was observed that the thickness at the filet decreased to 1.67 mm. The application of a counter punch during sizing forming facilitated the formation of a flat bottom and improved the radium sizing; however, that the bottom thickness decreased was inevitable. The final thickness at the bottom center, \(T_{4}^{5}\), was 1.84 mm. The anisotropies of the blank resulted in an earring on the sidewall. After the sheet forming processes were conducted, the minimum height of the cup was 23 mm, which satisfies the next upsetting forming process.
Figure 9(b) shows the effective strain distribution and geometric shape in the representative vertical section obtained from the 3D simulation. In the deep drawing simulation, an isotropic hardening model was used to avoid the formation of an earring, and the initial blank diameter was set to the theoretical value, i.e., 55 mm. Based on the simulation results, the maximum strain value was at the top of the sidewall. In addition, a slight deformation occurred at the bottom owing to the application of the counter punch during filet sizing.
4.2 Application of Lock Bead on Punch
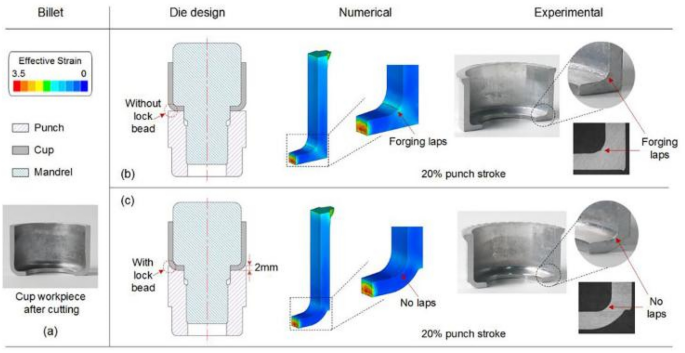
After performing the sheet-forming processes, cutting was performed to remove the earring and obtain a cup with a uniform sidewall height. To fix the cup bottom, a hole is necessary when the mandrel and punch are connected. In addition, a uniform sidewall height can be obtained in the simulation; hence, the sidewall need not be cut in the FEM simulation. The height of the experimental cup preform after cutting was consistent with that of the simulation, which was H0 = 20 mm. The semi-completed workpiece is shown in Figure 10(a). The die design and 20% punch stroke were set as typical moments to compare the forming results, as shown in Figure 10(b) and (c).
As mentioned above, maximum thinning occurred at the corner. Typically, the punch is flat, without a lock bead. When upsetting was performed on the sidewall, the material flowed to the clearance first between the workpiece and punch around the filet. Without any support to the outer surface of the filet, inner forging laps were formed, as indicated in both the numerical and experimental results (see Figure 10(b)). This phenomenon might shorten the service life of the component. To create forging laps, a lock bead was integrated into the punch. The design of the lock bead is shown in Figure 10(c). Considering the target component geometry, the height was set to 20 mm. With the support of the mandrel and lock bead, the material at the filet remained almost undeformed when upsetting was performed on the sidewall. The experimental results agreed well with the numerical results, and both proved that a lock bead attached to the punch can efficiently eliminate the forging lap.
4.3 Formation of External Gearing Using U-CDZ Method
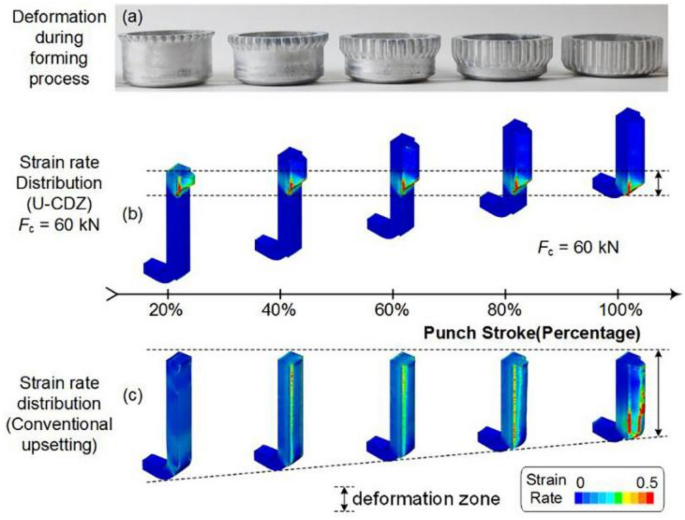
For the manufacturing of the external gearing on the drawn cups, the most important core process was upsetting the sidewall, as it determines the final forming quality. To understand the forming mechanism of U-CDZ, a detailed comparison of the strain rate distribution and section profile is shown in Figure 11 for several punch strokes, i.e., 20%, 40%, 60%, 80%, and 100% punch strokes.
The strain rate distribution obtained via the U-CDZ method under a counter force of 60 kN is shown in Figure 11(b). In this case, the material was pushed from the holding cavity into the forming cavity owing to the feeding of the punch. The counter punch retracted and afforded more spaces and simultaneously upset the material to form an external gearing. It is reasonable to state that the material does not undergo plastic deformation at a certain moment if the strain rate is zero. Therefore, a stabilized deformation zone was established, as observed in the nonzero-strain-rate zone around the partitioning line between the forming cavity and holding cavity. By contrast, in the conventional upsetting method, the nonzero-strain-rate zone was throughout the entire cup sidewall, which implies that plastic deformation occurred on the entire cup sidewall, as shown in Figure 11(c). The deformation process of the external gearing during the experiment (as presented in Figure 11(a)) is reflected in the numerical analysis of the formation mechanism, where the deformation throughout the entire sidewall in the conventional upsetting method was transferred to the accumulation of incremental deformation in the U-CDZ upsetting method.
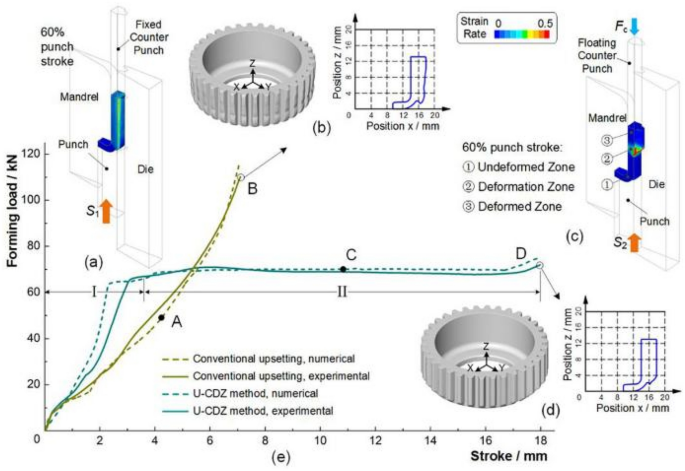
An enlarged view of the strain rate distribution of the workpiece in the U-CDZ method at 60% of the total punch stroke is shown in Figure 12(c). The workpiece can be categorized into three zones: zone 1, which is the undeformed zone; zone 2, which is the deformation zone; and zone 3, which is deformed zone. The punch pushed the material from Zone 1 to Zone 2, and under the counter force, the materials in Zone 2 underwent plastic deformation. The deformed material propagated continuously into Zone 3, and the counter punch retracted gradually, thereby facilitating the formation of the external gearing. In the conventional upsetting method, the material was upset along the axial direction, and the forming cavity was filled via radial flow, as shown in Figure 12(a). Owing to the different material flow modes, the evolution of the force–displacement curves and the final geometrical results exhibited entirely different characteristics. As shown in Figure 12(e), in the U-CDZ method, the forming load can be categorized into two stages: before and after the establishment of the stabilized deformation. Initially, the materials were pushed to fill the die clearance. In this stage, the forming load increased rapidly to overcome the counter force until the counter punch was retracted. Once a stabilized deformation was established, the forming load remained almost unchanged. However, in the conventional upsetting method, the forming load indicated an endless increasing trend, and a completely filled die cavity was difficult to achieve, which is characteristic of the closed-die forging process. Figure 12(b) and (d) show the workpiece after forming, including the digital models and vertical cross-section at the tooth tip obtained using the ATOS optical scanner. It was clear that, compared with the conventional upsetting method, the U-CDZ method yielded an external gearing with higher accuracy under a lower forming load.
Comparison between conventional upsetting and U-CDZ methods: (a) material flow based on conventional method (60% punch stroke), (b) digital models and vertical cross-section at tooth tip obtained using ATOS optical scanner, (c) material flow based on U-CDZ method (60% punch stroke), (d) digital models and vertical cross-section at tooth tip obtained using ATOS optical scanner, (e) forming load and displacement curves
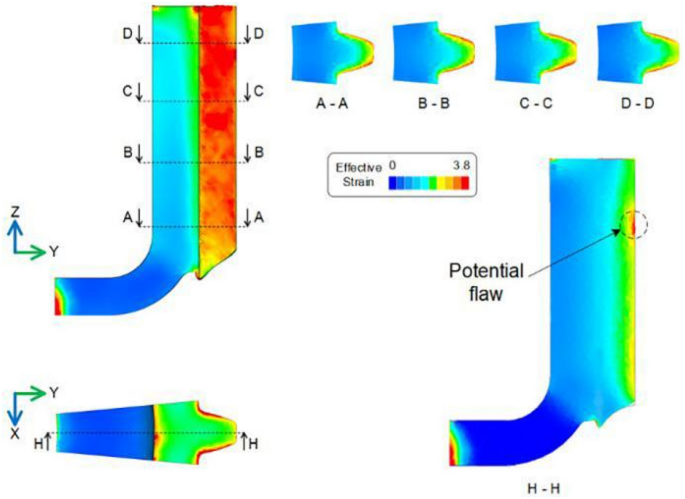
In addition to a high dimensional accuracy, the U-CDZ method yields final components that exhibit uniform properties. By analyzing the effective strain distribution after forming (as presented in Figure 13), it was observed that a small plastic deformation appeared around the hole at the bottom; this occurred because some clearance was present to fill in these areas when upsetting was performed on the sidewall. Under the support of the mandrel and punch by the lock bead, the other material at the bottom remained almost unchanged, and plastic deformation almost occurred.
Owing to the accumulation of stabilized deformation, the vertical cross-section on the tooth tip, i.e., section H–H, indicated a uniform distribution of the effective strain along the axial direction. The effective strain was higher at locations closer that the tooth tip. An identical distribution trend was observed at sections A–A, B–B, C–C, and D–D at different sidewall heights. The results show that a higher effective strain was primarily concentrated uniformly on the outer surface of the tooth, which benefitted the fatigue life of the gear transmission. However, it is noteworthy that a flaw was observed in section H–H. It was initiated at the instant the stabilized deformation zone was established; according to a previous study, it can be eliminated by adopting optimized structures of the die and counter punch [29].
4.4 Effect of Counter Force
A stabilized deformation zone determines the forming quality and forming load [30], and to analyze the effects of the experimental core parameters, several counter forces, i.e., 30, 40, 50, and 60 kN, were tested in the study cases.
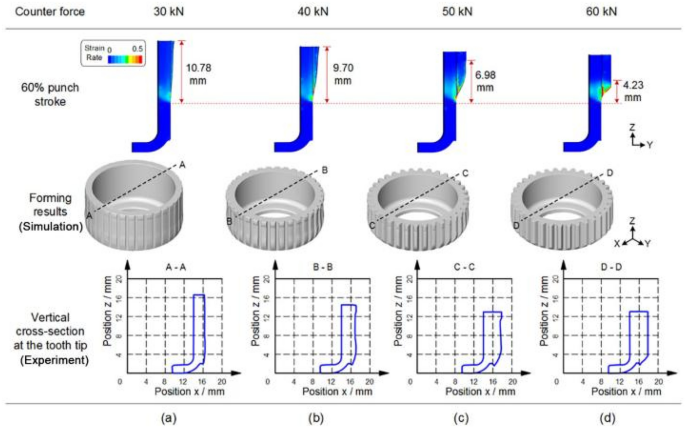
As shown in Figure 14, a 60% punch stroke was adopted as a typical moment to compare the strain rate distribution under different counter forces, and the experimental results are presented.
It was clear that the counter force determined the height of the deformation zone, which decreased from 10.78 to 4.23 mm as the counter force increased. Furthermore, the counter punch was vital to the upsetting of the material that was pushed into the forming cavity. When the counter force was sufficiently large, the material in the deformed zone completely filled the gearing cavity. Hence, the deformation of these materials transformed into a rigid movement instead of plastic deformation. Subsequently, a stabilized deformation can be established, as mentioned in Sect. 4.3. The digital models and vertical cross-section at the tooth tip of the experimental workpiece obtained using the ATOS scanner shown in Figure 14 supported the abovementioned conjecture. Under a counter force of 30 kN, a slight plastic deformation occurred on the sidewall because the counter force was insufficient to upset the material to form the external gearing. As the counter force increased, the tooth filling improved significantly. A sound external gearing was formed under a counter force of 60 kN.
5 Conclusions
SBMF is a new efficient method for manufacturing complex sheet components with functional elements at a low cost and with high efficiency, particularly in automobile transmission systems such as double cylindrical components with different thicknesses and clutch carriers with inner drums. In this study, upsetting with a U-CDZ was performed to form external gearing on a cup sidewall, which was semi-completed via sheet forming. The conclusions are as follows.
-
(1)
An entire process chain involving drawing and upsetting was performed. It was experimentally and numerically demonstrated that the U-CDZ method can be used to manufacture external gearing structures.
-
(2)
In the U-CDZ method, the materials were pushed from the holding cavity into the forming cavity gradually, and the forming mechanism transformed to the accumulation of the deformation zone instead of formation throughout the entire sidewall. Therefore, the U-CDZ method can form an external gearing with high accuracy and a uniform distribution of effective strain, as well as a low forming load.
-
(3)
Counter force was the key process parameter in the formation of external gearing using the U-CDZ method. Under a higher counter force, a smaller deformation zone was obtained, and the filling ratio increased.
-
(4)
In the upsetting process, forging laps occurred easily at the inner bottom filet. A lock bead structure, which has been proven experimentally to be valid for preventing inner forging laps, was adopted to optimize the material flow.
References
A E Tekkaya, N B Khalifa, G Grzancic, et al. Forming of lightweight metal components: Need for new technologies. Procedia Engineering, 2014, 81(28-37).
M Merklein, J M Allwood, B A Behrens, et al. Bulk forming of sheet metal. CIRP Annals - Manufacturing Technology, 2012, 61(2): 725-747.
K Mori, T Nakano. State-of-the-art of plate forging in Japan. Production Engineering: Research and Development, 2015, 10(1): 81-91.
A Maeda, K Araki. Plate gear. Japanese Patent, 9-222158, 1996. (in Japanese)
T Nakano. Introduction of flow control forming (FCF) for sheet forging and new presses. Proceedings of 5th International Seminar on Precision Forging, 2009: 35-40.
T Schneider, M Merklein. Manufacturing of geared sheet metal components by a single-stage sheet-bulk metal forming process. Key Engineering Materials, 2013, 554-557: 1478-1483.
K Isik, G Gerstein, T Schneider, et al. Investigations of ductile damage during the process chains of toothed functional components manufactured by sheet-bulk metal forming. Production Engineering, 2016, 10(1): 5-15.
J P Magrinho, M B Silva, P Martins. A flexible sheet-bulk forming demonstrator. International Journal of Advanced Manufacturing Technology, 2019, 103(1-4).
M Merklein, R Plettke, T Schneider, et al. Manufacturing of sheet metal components with variants using process adapted semi-finished products. Key Engineering Materials, 2012, 504-506: 1023-1028.
S Opel, T Schneider, M Merklein. Manufacturing of geared sheet metal components using flexible rolled tailored blanks. Key Engineering Materials, 2013, 554-557(2): 1459-1470.
M Merklein, J Koch, S Opel, et al. Fundamental investigations on the material flow at combined sheet and bulk metal forming processes. CIRP Annals - Manufacturing Technology, 2011, 60(1): 283-286.
M Löffler, D Groebel, U Engel, et al. Analysis of effectiveness of locally adapted tribological conditions for improving product quality in sheet-bulk metal forming. Applied Mechanics & Materials, 2015, 794: 81-88.
T Maeno, K Osakada, K Mori. Reduction of friction in compression of plates by load pulsation. International Journal of Machine Tools & Manufacture, 2011, 51(7-8): 612-617.
T Maeno, K Mori, A Hori. Application of load pulsation using servo press to plate forging of stainless steel parts. Journal of Materials Processing Technology, 2014, 214(7): 1379-1387.
B A Behrens, S Hübner, R Krimm, et al. Development of a hydraulic actuator to superimpose oscillation in metal-forming presses. Key Engineering Materials, 2011, 473: 217-222.
B A Behrens, S Hübner, M Vucetic. Influence of superimposing of oscillation on sheet-bulk metal forming. Key Engineering Materials, 2013, 554-557: 1484-1489.
B A Behrens, S Hübner, P Müller, et al. New multistage sheet-bulk metal forming process using oscillating tools. Metals, 2020, https://doi.org/10.3390/met10050617.
B A Behrens, A Bouquecha, M Vucetic, et al. Numerical and experimental investigations of multistage sheet-bulk metal forming process with compound press tools. Key Engineering Materials, 2015, 651-653: 1153-1158.
P Sieczkarek, L Kwiatkowski, A E Tekkaya, et al. Innovative tools to improve incremental bulk forming processes. Key Engineering Materials, 2013, 554-557(12): 1490-1497.
P Sieczkarek, L Kwiatkowski, N B Khalifa, et al. Novel five-axis forming press for the incremental sheet-bulk metal forming. Key Engineering Materials, 2013, 554-557(2): 1478-1483.
S Wernicke, S Gies, A E Tekkaya. Manufacturing of hybrid gears by incremental sheet-bulk metal forming. Procedia Manufacturing, 2019, 27: 152-157.
S Wernicke, P Sieczkarek, S Gies, et al. Properties of components with incrementally formed gears. Metals, 2019, 9(5): 1-13.
S Wernicke, M Hahn, G Gerstein, et al. Strain path dependency in incremental sheet-bulk metal forming. International Journal of Material Forming, 2020.
S Wernicke, U Thier, M Hahn, et al. Controlling material flow in incremental sheet-bulk metal forming by thermal grading - ScienceDirect. Procedia Manufacturing, 2020, 50: 257-264.
S F Zhu, X C Zhuang, Y Zhu, et al. Thickening of cup sidewall through sheet-bulk forming with controllable deformation zone. Journal of Materials Processing Technology, 2018, 262: 597-604.
P Sieczkarek, K Isik, N B Khalifa, et al. Mechanics of sheet-bulk indentation. Journal of Materials Processing Tech., 2014, 214(11): 2387-2394.
H U Viezigmann, M Merklein, U Engel. Friction conditions in sheet-bulk metal forming. Procedia Engineering, 2011, 19: 377-382.
S F Zhu, X C Zhuang, Y Yang, et al. Investigation of a tailored blank for the elimination of forging laps during cup sidewall upsetting. The International Journal of Advanced Manufacturing Technology, 2020, 109(2): 2311-2324.
Y Zhu, S F Zhu, X C Zhuang, et al. Die structure optimization for eliminating premature folding of sidewall upsetting with a controllable deformation zone. International Journal of Advanced Manufacturing Technology, 2019, 105(1-4): 1411-1424.
L Hua, S Liu, H Xu. Simulation and fracture prediction of the combined blanking and extrusion process of sheet metal. Journal of Plasticity Engineering, 2008, 15(004): 46-50. (in Chinese)
Acknowledgements
Not applicable.
Funding
Supported by National Natural Science Foundation of China (Grant Nos. 51875351, 51475296).
Author information
Authors and Affiliations
Contributions
XZ and ZZ designed the experimental work, organized the analysis work, and coordinated the writing of the article. ML and YZ conducted the experimental work and evaluated the obtained results. SZ conducted literature review and analyzed the U-CDZ results. All authors read and approved the final manuscript.
Authors’ Information
Xincun Zhuang, born in 1980, is currently a professor at Institute of Forming Technology and Equipment, School of Materials Science and Engineering, Shanghai Jiao Tong University China. He received his doctorate degree from Shanghai Jiao Tong University, China, in 2008. His research interests include sheet-bulk metal forming processing and mechanical behavior of materials.
Meile Liang, born in 1997, is currently a doctorate candidate at Institute of Forming Technology and Equipment, School of Materials Science and Engineering, Shanghai Jiao Tong University China. He received his bachelor degree on material forming and control engineering from Chongqing University, China, in 2019.
Shengfa Zhu, born in 1991, is a doctorate candidate at Institute of Forming Technology and Equipment, School of Materials Science and Engineering, Shanghai Jiao Tong University China.
Yin Zhu, born in 1995, is a master candidate at Institute of Forming Technology and Equipment, School of Materials Science and Engineering, Shanghai Jiao Tong University China.
Zhen Zhao, born in 1972, is currently a professor at Institute of Forming Technology and Equipment, School of Materials Science and Engineering, Shanghai Jiao Tong University China. He received his doctorate degree from Shanghai Jiao Tong University, China, in 2002. His research interests include sheet-bulk metal forming processing and mechanical behavior of materials.
Corresponding author
Ethics declarations
Competing Interests
The authors declare no competing financial interests.
Rights and permissions
Open Access This article is licensed under a Creative Commons Attribution 4.0 International License, which permits use, sharing, adaptation, distribution and reproduction in any medium or format, as long as you give appropriate credit to the original author(s) and the source, provide a link to the Creative Commons licence, and indicate if changes were made. The images or other third party material in this article are included in the article's Creative Commons licence, unless indicated otherwise in a credit line to the material. If material is not included in the article's Creative Commons licence and your intended use is not permitted by statutory regulation or exceeds the permitted use, you will need to obtain permission directly from the copyright holder. To view a copy of this licence, visit http://creativecommons.org/licenses/by/4.0/.
About this article
Cite this article
Zhuang, X., Liang, M., Zhu, S. et al. Sheet Bulk Forming of Thin-Walled Components with External Gearing through Upsetting Using Controllable Deformation Zone Method. Chin. J. Mech. Eng. 34, 138 (2021). https://doi.org/10.1186/s10033-021-00664-2
Received:
Revised:
Accepted:
Published:
DOI: https://doi.org/10.1186/s10033-021-00664-2
