- Review article
- Open access
- Published:
Defect Formation Mechanisms in Selective Laser Melting: A Review
Chinese Journal of Mechanical Engineering volume 30, pages 515–527 (2017)
Abstract
Defect formation is a common problem in selective laser melting (SLM). This paper provides a review of defect formation mechanisms in SLM. It summarizes the recent research outcomes on defect findings and classification, analyzes formation mechanisms of the common defects, such as porosities, incomplete fusion holes, and cracks. The paper discusses the effect of the process parameters on defect formation and the impact of defect formation on the mechanical properties of a fabricated part. Based on the discussion, the paper proposes strategies for defect suppression and control in SLM.
1 Introduction
Additive manufacturing (AM) is an approach in which a part is manufactured layer by layer from the data of a 3D model. AM is a “bottom-up” approach as opposed to the traditional subtractive manufacturing that is often referred to as the “top-down” approach [1, 2]. The AM approach does not require the traditional tools, fixtures and complicated procedures. Therefore, it can offer an advantage of economically fabricating a customized part with complex geometries in a rapid design-to-manufacture cycle. With the development of high energy beams, it becomes possible to manufacture metal parts of high performance. Due to its unique advantages, the AM approach has been widely applied in many industries, such as aerospace, medical devices, military and automobile [3–5].
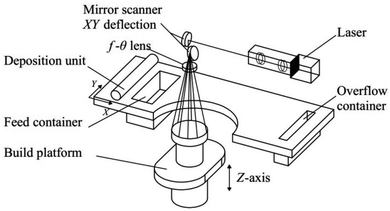
Selective Laser Melting (SLM) is one of the additive manufacturing processes. It is relatively mature and has been a research focus in manufacturing metallic parts [6]. A schematic layout of a typical SLM setup is presented in Fig. 1 [7]. During the SLM process, data is provided from a CAD model which is then sliced into thin layers. Each sliced layer is further developed with the appropriate scan paths. Through the scanner mirrors, a laser beam selectively scans and melts the powders that are previously paved on the substrate according to the developed scan paths. After a layer is finished, the building platform is lowered by an amount equal to the layer thickness, and a new layer of powders is paved. The process repeats until the completion of the whole part. To date, the SLM process is able to fabricate metallic parts from different material powders, such as titanium alloys [7, 8], nickel-based superalloys [9, 10], aluminum alloys [11, 12] and stainless steels [13, 14].
Schematic layout of a typical SLM setup [7]
Although the SLM process offers a great advantage in manufacturing complex parts at a high material utilization rate [15], it is affected by many factors, such as laser energy input and scan speed, scan strategy, powder material, powder size and morphology. The SLM process consists of complicated physics, such as absorption and transmission of laser energy [16], rapid melting and solidification of material, microstructure evolution [17, 18], flow in a molten pool [19], and materials evaporation [20]. The process is thus affected by the aforementioned factors to form defects of porosities, incomplete fusion holes, cracks, and impurities, etc. These defects are detrimental to a fabricated part in terms of its mechanical and physical properties, which in turn limits the application of SLM [21–24].
Since defect formation is a critical issue in an SLM process, research has been directed towards understanding and suppression of defect formation [7, 24–36]. This paper reviews the recent research outcomes on the types and formation mechanisms of the common SLM defects, such as porosities, incomplete fusion holes, and cracks. The paper also reveals how the SLM defects may affect the mechanical properties of a fabricated part. Other defects, such as metallic inclusions, segregations, residual stresses, metallurgical imperfections may also have a significant impact on the mechanical properties of a fabricated part, their respective formation mechanisms will be reviewed in a separate paper and published elsewhere. Finally, the paper provides a reference for defect suppression and control in the SLM processes.
2 Defect Types
Many parameters are involved in an SLM process, such as laser power, scan speed, hatch spacing, layer thickness, powder materials and chamber environment. Defects are inevitably introduced if any of these parameters are improperly chosen. The common defects are classified in three types: porosities, incomplete fusion holes, and cracks.
2.1 Porosities
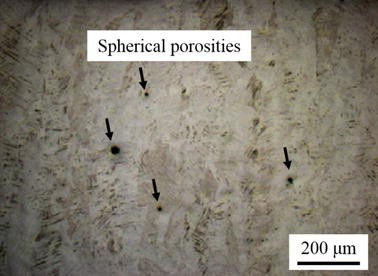
A porosity is usually small in size, typically less than 100 μm with an approximately spherical shape, as shown in Fig. 2 by arrows. The formation mechanisms of porosities are described as follows [7, 23, 24, 28].
Optical image of spherical porosities (marked by arrows) in an SLM part [7]
Firstly, if the packing density of metal powders is low, e.g., 50 percent, the gas present between the powder particles may dissolve in the molten pool. Because of the high cooling rate during the solidification process, the dissolved gas cannot come out of the surface of the molten pool before solidification takes place. Porosities are thus formed and remain in the fabricated part. Porosities may also be formed when metal powders of a hollow structure are utilized in an SLM process. On the other hand, the molten pool temperature is generally high due to the intense laser power. At this temperature, gas solubility in the liquid metal is high, making its enrichment easier. Furthermore, in the process of preparing powder materials, gas is inevitably introduced into the powder materials, especially the gas atomized powder materials in the scope of protection by an inert gas, such as argon or helium.
Qiu et al [28] observe that the porosities contain ridges in the internal surfaces and are thus probably associated with the incomplete re-melting of some local surfaces from the previous layers. The ridges form small volumes to which the molten metal is difficult to flow and penetrate. On the other hand, Gong et al [29] attribute these porosities to gas bubbles generated when a high laser energy is applied to the molten pool. Gas bubbles can be induced due to vaporization of low melting point constituents within an alloy. They can be far beneath the surface at the bottom of the molten pool. The high solidification rate of the molten pool does not give gas bubbles sufficient time to rise and escape from the surface. Thus, gas bubbles are trapped in the molten pool, resulting in defect inclusions of regular spherical porosities in the forming part.
It is therefore understood that such spherical porosities are generally resulted from the entrapped gases in the molten pool due to the excessive energy input or unstable process conditions. The spherical porosities are randomly distributed in an SLM fabricated part, and difficult to eliminate completely.
2.2 Incomplete Fusion Holes
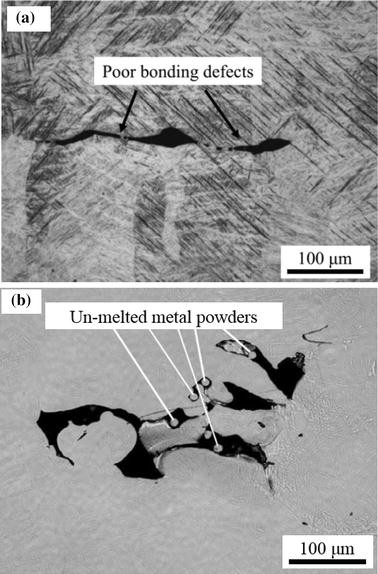
Incomplete fusion holes, also known as lack-of-fusion (LOF) defects, are mainly due to the lack of energy input during an SLM process. The formation of the LOF defects is because the metal powders are not fully melted to deposit a new layer on the previous layer with a sufficient overlap [24, 29]. An LOF defect may contain numerous un-melted metal powders, as shown in Fig. 3(b) [37]. There are two types of LOF defects: (1) poor bonding defects due to insufficient molten metal during a solidification process, as in Fig. 3(a), and (2) defects with un-melted metal powders in Fig. 3(b).
Optical images of LOF defects in SLM fabricated parts: (a) poor bonding defects; (b) LOF defects with un-melted metal powders [37]
In the SLM process, a laser selectively melts the metal powders point by point, line by line, and layer by layer to complete the whole part. If the laser energy input is low, the width of the molten pool is small, which results in an insufficient overlap between the scan tracks. The insufficient overlap is a cause of formation of the un-melted powders between the scan tracks. In the deposition process of a new layer, it becomes difficult to fully re-melt these powders. As a consequence, incomplete fusion holes are formed and remain in the SLM fabricated part. Furthermore, if the laser energy input is too low to cause an enough penetration depth of the molten pool, LOF defects may be generated due to a poor interlayer bonding [24, 29, 37]. Therefore, LOF defects are usually distributed between the scan tracks and the deposited layers.
Moreover, in a location where defects have been generated, the surface of the location becomes rough. The rough surface directly contributes to the poor flow of the molten metal to form interlayer defects. The interlayer defects may gradually extend and propagate upwards to form large multi-layer defects in a continuous deposition process [38].
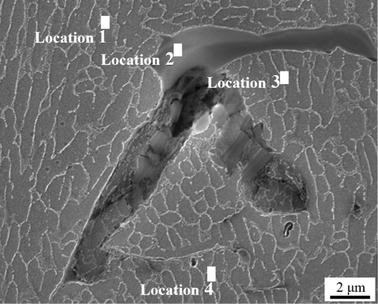
For the easily oxidized alloy materials, such as aluminum AlSi10Mg, a layer of oxide film is usually produced at the surface of a part with residual oxygen in the SLM process. Then wettability decreases and molten metal flow is blocked, leading to a poor bonding between the layers to form the incomplete fusion defects [25, 39]. Fig. 4 shows an image of an incomplete fusion defect. From the EDX (Energy Dispersive X-ray Spectrometer) data presented in Table 1, location 2 of an incomplete fusion defect is rich in oxygen, suggesting that this irregular defect should be associated with the presence of an oxide layer which could prevent the progress of bonding [39].
SEM image of an incomplete fusion defect at different locations [39]
2.3 Cracks
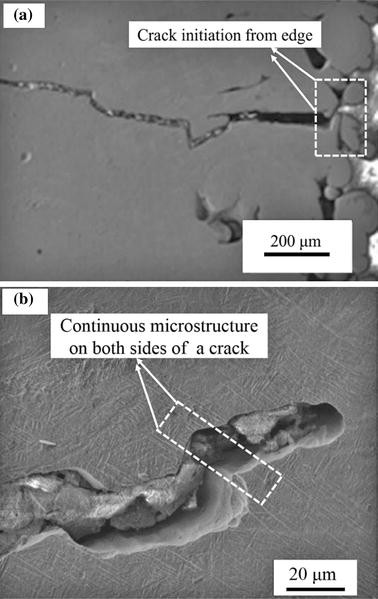
In an SLM process, metal powders experience rapid melting and rapid solidification under a high local laser energy input. The cooling rate of the molten pool reaches 108 K/s [22], which creates a great temperature gradient and correspondingly a large residual thermal stress in the fabricated part. The high temperature gradient combined with the great residual stress often causes crack initiation and propagation in a fabricated part [22, 40, 41]. Fig. 5(a) shows the crack morphology in an SLM fabricated titanium part. Cracks are more prone to initiating from the as-built surface that is adhered with the partially melted metal powders. Fig. 5(b) shows the microstructure on both sides of a crack. It can be observed that elongated needle-type crystal grains are continued on the both sides of the crack, indicating a typical transgranular mode of cracking [40].
SEM images of crack morphology and microstructure from the cross section of an SLM fabricated Ti6Al4V part: (a) crack morphology; (b) microstructure on both sides of the crack [40]
For stainless steels and nickel-based superalloys, because of their low thermal conductivity and high thermal expansion coefficient, they are more vulnerable to generating cracks with high susceptibility to cracking in an SLM process [9, 27, 42, 43]. To solve this problem, pre-heating the substrate and improving the ambient temperature are recommended to reduce the cracks in the SLM fabricated parts [26, 27].
3 Effect of Process Factors on Defect Formation
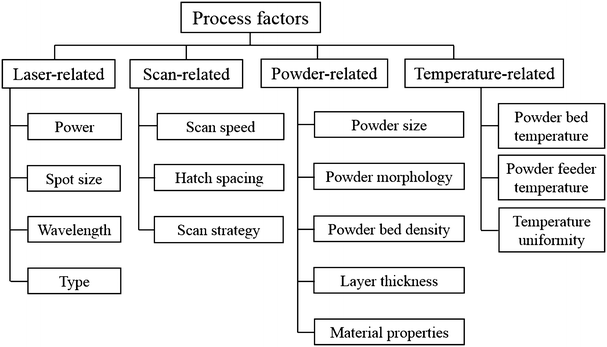
Many process factors are involved in an SLM process. Some of the factors are process parameters that can be predetermined, while the others cannot be predetermined since they are generated from the SLM process. As described in Fig. 6, the major process factors can be classified into four types: laser-related, scan-related, powder-related, and temperature-related. Based on the principle that laser selectively melts the powders, the major factors which are related to defect formation in an SLM process are laser energy input, powder material, and scan strategy. Therefore, the following Sections 3.1-3.3 are dedicated to discussing defect formation in terms of the three factors.
Process factors involved in an SLM process [23]
3.1 Effect of Laser Energy Input
Laser energy input directly determines the melt condition of metal powders, the flow of molten metal, which has a significant impact on the type and size of the defects in an SLM process. The energy input in the material can be related to the main process parameters, such as laser power, scan speed, hatch spacing, and layer thickness.
At a relatively low scan speed and a high laser power, the energy input is high, more powders are melted at an elevated temperature, porosity defects are created. These defects can be attributed to the entrapped gas originated from the raw material powders in the SLM process as mentioned above. In addition, low melting point constituents, e.g., Al, Mg elements in the alloy, may evaporate into gas to form gas bubbles. During the rapid solidification process in SLM, the gas bubbles do not have sufficient time to escape from the molten pool to the pool surface. They remain within the molten pool to form porosity defects of a spherical shape [29, 44]. On the other hand, the molten pool becomes large if energy input is high, which causes powder denudation around the molten pool. The denudation process results in insufficient molten metal to fill the gap between the adjacent tracks. Large porosities are thus formed [7].
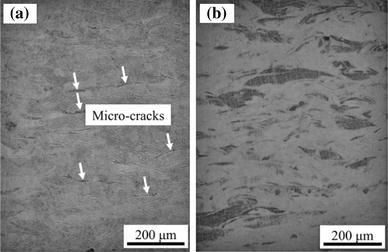
Furthermore, a relatively low scan speed and a high energy input may result in a high residual thermal stress in a rapid melting and solidification process. The higher the energy input, the more severe the contraction of the molten metal in the solidification process. A high residual stress is induced during the solidification process [22, 40, 45]. As shown in Fig. 7(a), with a high energy input, micro-cracks are observed in an SLM CP-Ti part. Conversely, almost no defects are found when an appropriate energy input is utilized, as shown in Fig. 7(b).
Optical images showing the microstructures on the cross-sections of SLM-processed Ti parts fabricated at different energy inputs: (a) cross-section with micro-cracks due to a higher energy input (P = 90 W, v = 100 mm/s); (b) nearly defect-free cross-section due to an appropriate energy input (P = 90 W, v = 200 mm/s) [22]
At a relatively high scan speed and a low laser power, the energy input is too low to fully melt the powders, generating a discontinuous molten pool. This makes it difficult to fully melt the powders between the adjacent tracks to form an effective overlap, resulting in the formation of incomplete fusion defects. In addition, if a large powder thickness causes an insufficient penetration of the laser energy input, an effective overlap may not be developed between layers, causing the formation of interlayer incomplete fusion defects [24, 29, 45, 46].
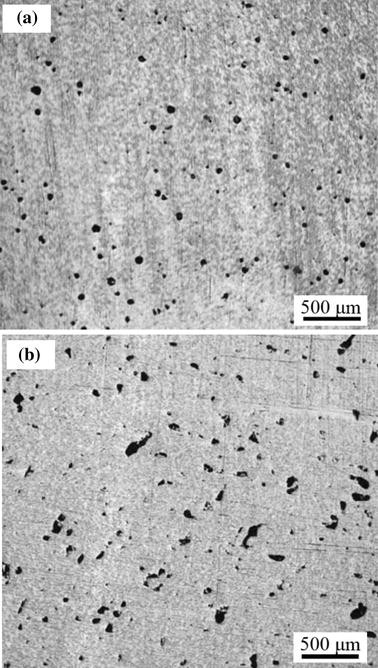
Fig. 8 shows two different defect types in the SLM fabricated titanium alloys under two different energy input conditions (laser power and other parameters remain constant, but scan speed varies) [47]. Fig. 8(a) describes the regular spherical defects under the higher energy input conditions. Conversely, Fig. 8(b) shows irregular incomplete fusion holes under the lower energy input conditions.
Optical images of defect morphologies at different energy inputs in the SLM-processed Ti6Al4V parts: (a) spherical porosities (P = 120 W, v = 40 mm/s); (b) incomplete fusion holes (P = 120 W, v = 1500 mm/s) [47]
Generally, energy density E is widely used to characterize energy input, which is a measure of the average applied energy per unit volume of the deposited material in an SLM process. Eq. (1) provides a representation of energy density E (J/mm3):
where P is laser power (W); v is scan speed (mm/s); h is hatch spacing (mm); and t is layer thickness (mm). The parameters in the equation reflect the impact of overlap between tracks, layer thickness and energy input and can easily be determined. Therefore, as a representation of energy input, this equation is used widely in the SLM processes [7, 29, 48].
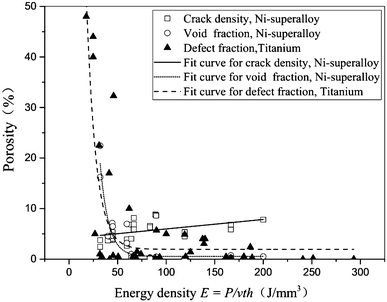
Fig. 9 shows a scatter plot for both the void and defect fractions (%) as well as crack density that is represented by crack length per unit cross-sectional area (mm/mm2) against energy density E (J/mm3) in the SLM fabrication of high temperature Ni-superalloy and porosity in SLM Titanium parts [27]. As seen from the figure, with an increase in the energy density, more material is melted, void fraction is quickly reduced, especially when the energy density exceeds 70 J/mm3. A similar result can be acquired from the calculation results by different research groups on energy density calculation for the SLM fabricated titanium parts, but the appropriate energy density is different due to different materials [7, 22, 28, 47–52]. Conversely, the crack density shows a slight increase with the increase in energy density due to the large thermal stress caused by the excessive energy input.
Therefore, as an integrated parameter, energy density represents the combined effect of the major process parameters on defect formation in an SLM process. Energy density is handy to use in selecting the appropriate laser power, scan speed, hatch spacing, layer thickness to minimize the defects and improve the manufacturing efficiency in the SLM process.
3.2 Effect of Powder Materials
The morphology and size of metal powders have a significant influence on the powder bed smoothness and powder flowability, thus are strictly required in an SLM process. Metal powders are produced in different methods, such as water atomization, gas atomization, plasma rotating electrode and electrolytic method, which has a diverse effect on defect formation [53–55]. In addition, the gas contained in the powders increases the probability of defect formation.
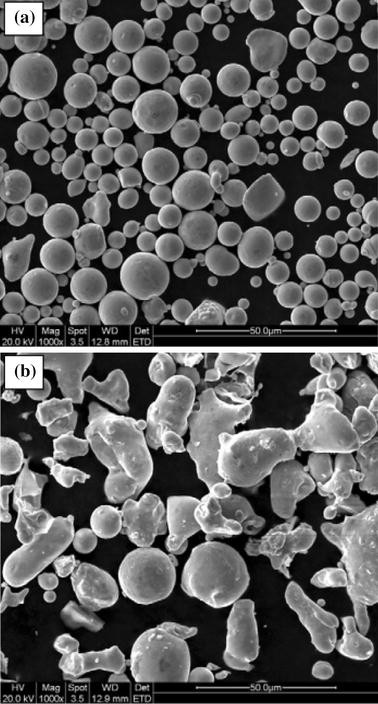
Wang et al [33] examined the effect of different powder sizes of the 316L stainless steel on the part quality in the SLM process. They reported that the metal powders of a smaller size tended to reduce porosities in the fabricated parts compared to those of a larger size. The relative density reached 99.75% with the average powder size of 26.36 μm, which was compared to 97.50% with the average powder size of 50.81 μm. Li et al [41] explored the densification behavior of gas and water atomized 316L stainless steel powders. As shown in Fig. 10, the gas atomized powders possessed spherical shapes compared to irregular shapes of the water atomized powders. The results demonstrated that the parts fabricated with the gas atomized powders acquired a higher relative density, less porosity compared to those with the water atomized powders, which can be attributed to the differences in morphology, packing density, flowability and oxygen contents between the two powders.
SEM images showing characteristic morphologies of stainless steel powders produced by: (a) gas atomization; (b) water atomization [41]
3.3 Effect of Scan Strategy
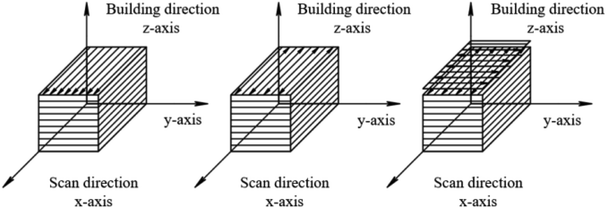
Scan strategy directly affects the heat transfer, powders melting and solidification, and ultimately defect location and distribution. Generally, three different scan strategies have been utilized in the SLM processes, namely “unidirectional”, “zigzag”, and “cross-hatching”, as shown in Fig. 11 [7]. For the unidirectional and zigzag scan strategies, at the beginning and end of a scan track, laser power is usually unstable and scan speed is gradually reduced, which tends to result in a relatively higher laser energy input and defect formation [20, 56]. In addition, the impurities in the powders may also be pushed to the ends of a track in the densification process to form higher defect density. Actually, incomplete fusion defects are more frequently generated between the scan tracks and layers [57, 58]. Cross-hatching scan strategy can make the entire laser energy input more balanced in the whole layers, which effectively prevents defect accumulation and propagation.
Three different scan strategies: “unidirectional” (left), “zigzag” (center), and “cross-hatching” (right) [7]
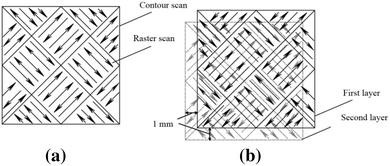
The “island scan strategy” has been developed for parts fabrication, as illustrated in Fig. 12 [39]. Firstly, the filled layer is divided into several islands with each island being built randomly and continuously. Then the successive layers are displaced in a certain distance, so as to avoid the accumulation of defects in the same location. Furthermore, the residual thermal stress in the SLM fabricated parts can be more balanced to reduce cracks development. However, due to the problem of potentially unstable laser energy input and the change in scan orders, defects are generally formed at the border of small islands, which needs further improvements for the “island scan strategy”.
Schematic illustration of the island scan strategy, (a) each layer is divided into islands and raster scanned; (b) the successive layers are displaced in 1 mm [39]
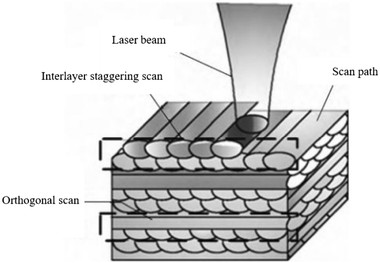
Yang et al [59, 60] applied the interlayer staggering and the orthogonal scan strategy to reducing the defects formed in the overlapping zone between tracks. As shown in Fig. 13, after one layer is completed, the laser scans the overlapping zone between the adjacent tracks to sufficiently melt powders in the next layer deposition. The orthogonal scan strategy is adopted in the next layer, so that energy input can be more balanced for reducing defects, as previously also mentioned.
Interlayer staggering and orthogonal scan strategy [60]
4 Influence of Defects on Mechanical Properties
Defects in an SLM process cause stress concentration in the fabricated part, which may lead to the part failure. When stress exceeds the material limit, a crack may form and gradually propagate in the part. The following Sections 4.1-4.2 are dedicated to discussing the influence of defects on the mechanical properties in the SLM parts.
4.1 Tensile Properties
As mentioned earlier, the metallic powders suffer a rapid melting and solidification in the SLM process, due to a large cooling rate, which produces a part with a finer grain microstructure and better tensile properties than those made of the traditional wrought counterparts [17, 30, 61, 62]. The tensile strength (TS), ultimate tensile strength (UTS), and elongation of the SLM titanium alloy parts are shown in Table 2. Both TS and UTS of the SLM titanium alloys are higher than their wrought counterpart, generally above 1,000 MPa. Therefore, the SLM titanium alloys can meet the tensile strength requirements for engineering applications. However, the elongations of the SLM titanium alloys are rather low (less than 10%), which may be attributed to the defects in the SLM parts.
Furthermore, the SLM process has a directional effect on the properties of the forming parts due to its basic deposition principle. The directional effect is a direct cause of the severe anisotropy in the mechanical properties of the fabricated part. For a part fabricated based on the orthogonal scan strategy shown in Fig. 13, defects may be formed and distributed in the horizontal direction, resulting in the obvious reduction of the load-bearing cross-section area in the fabricated part [66]. If the loading direction coincides with the building direction, the part is more susceptible to failure, leading to a low strength of the part [24, 37, 67]. In addition, because of the epitaxial growth in the SLM process, the elongated columnar grains in the fabricated part also aggravate anisotropy of the part [28, 34].
4.2 Fatigue Properties
For an SLM fabricated part, defects are more detrimental to its fatigue strength due to the points of stress concentration. A defect often serves as a source of crack initiation and propagation, which may greatly reduce the fatigue strength of the part. The stochastic distribution of the defects also aggravates the scattering of fatigue life, which may severely restrict the application of the SLM fabrication.
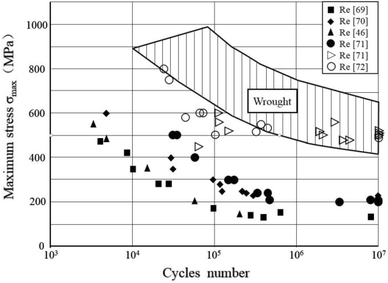
Fig. 14 shows the results on fatigue life obtained from the literature on the SLM Ti6Al4V parts and their wrought counterparts [68–73]. In Fig. 14, the filled dots represent the parts that were not post-processed (“as-built”), while the unfilled dots were subjected to machining. Due to the presence of both internal and surface defects, the fatigue strength of the “as-built” SLM samples was approximately 200 MPa, far below that of their wrought counterparts. After machining, the SLM samples showed a slightly improved fatigue life, but still lower than that of the wrought counterparts.
The morphology, number, size and location of defects all have a significant influence on the fatigue life of the SLM fabricated parts. Generally, the spherical defects have less influence on the fatigue life of a part due to their regular shapes and small size. On the other hand, the defects of an irregular shape (e.g., an incomplete fusion hole) promote stress concentration of a part so as to seriously reduce fatigue strength of the part because of the irregular shapes and larger sizes of the defects [37, 47].
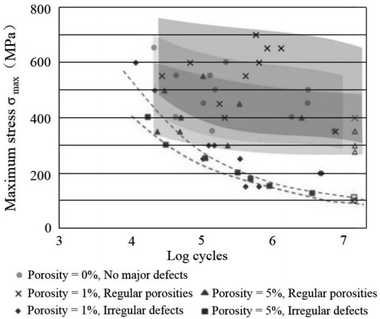
Gong et al [47] tested the SLM fabricated parts containing different numbers and types of defects, and found that the spherical defects had less influence on the fatigue life when the level of such defects was less than 1%, as shown in Fig. 15. However, the fatigue life was considerably decreased when these defects were amounted at the level of 5% porosity. Conversely, the irregular defects were found significantly detrimental to the fatigue life even when present in an amount as low as 1% porosity. When a part containing such defects in a higher amount of 5% in porosity, the part tended to have a low fatigue life with a narrow trend of dispersion, which suggests that the defects be so seriously detrimental to the fatigue life of the part even the statistical nature of fatigue life is defeated.
Fatigue performance of the parts containing defects from the SLM process [47]
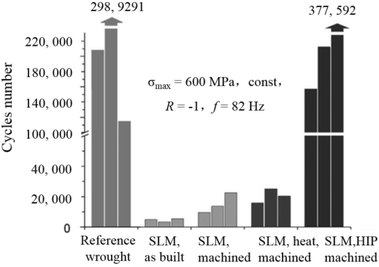
Kasperovich et al [65] tested the parts that were differently post-processed, namely, “as-built”, “surface-machined”, “heat-treated”, “hot isostatically pressed” (HIP, which is used in the traditional powder metallurgy and foundry technology, allows not only to adjust the microstructure, but also to fuse un-melted particles and generate “kissing bonds”). As shown in Fig. 16, after machining, the surface microcrack sources of parts are removed, enhancing the fatigue cycle of a part. The heat treatment process merely improves the microstructure of the part, but does not reduce or eliminate the defects. In this regard, the process can hardly improve the fatigue life of the parts. However, the HIP process may collapse the defects up to a certain size at an elevated temperature and pressure, reducing the number and size of the defects, and therefore improving the fatigue life of a part.
Fatigue life of the parts subjected to different post-processes [63]
Leuders et al [52, 63, 73] studied the mechanical properties and the growth mechanisms of fatigue cracks in the SLM titanium parts. Their results indicated that defects had a major impact on the fatigue life of the parts, especially at the stage of fatigue crack initiation. Due to the presence of defects, stress concentration could occur, causing crack initiation and consequently a decrease in fatigue strength. Leuders et al also analyzed the effect of defect location on the fatigue strength in their research. When a defect was located near the surface of a part, its fatigue life was shorter in comparison with that located far from the surface, indicating that defect location is critical to the fatigue strength of the part. Surface treatment, such as machining and shot peening, can be adopted to suppress or eliminate the near-surface defects so as to enhance part fatigue strength.
However, since it is difficult to accurately control the type, number, and location of a defect in a fabricated part, the fatigue strength of a part can be in jeopardy. Therefore, the fatigue strength of an SLM fabricated part is still questionable and needs to be improved.
5 Strategies for Defect Suppression
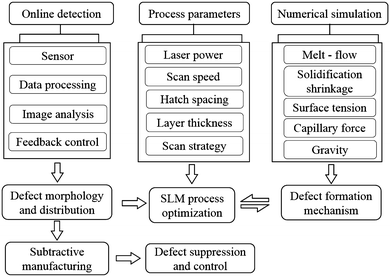
Defect suppression is a challenging issue in the SLM process. Currently, there are two major strategies to suppress defect formation in the SLM processes, namely online detection and numerical simulation, in addition to machining to reduce or eliminate defects.
Clijsters et al [74] designed a high-speed and real-time molten pool monitoring system, consisting of four modules, namely optical set-up, data processing, reference data and quality estimation. For each layer of deposition, the information of molten pool in the form of a light signal was collected by sensors, then transferred to a data processing module to establish the molten pool image, then used to analyze the location and size of defects compared with reference data to get the characteristics of molten pool to deduce defect formation information. Finally, the analysis results were used for the feedback control to optimize the process, and to reduce defect formation in the SLM fabricated parts.
Panwisawas et al [75] established a mathematical model of thermal fluid dynamics to better understand the morphological evolution of porosity during an SLM process. According to the deposition mechanism of the heating-melting-solidification cycles of metal powders, a thermal fluid dynamics model based on the Navier-Stokes equation, surface tension, capillary force, and Marangoni effect was introduced to explore the evolution of porosity as the scan speed increased. The results showed that for a fixed laser input power, increasing scan speed reduced energy input density, resulting in serious unfused defects in the interlayers.
It is an effective research strategy to combine the three methods, i.e., the traditional optimization test, the numerical simulation calculation and the online detection, for a systematic study on the defect formation and control in the SLM processes. As shown in Fig. 17, online detection is conducted for obtaining information on defect morphology, location and dimensions through detection sensors, data processing, image analysis and feedback control. The detected defects can be eliminated by the successive subtractive process. On the other hand, the strategy should also investigate defect formation and evolution mechanisms, including material melt-flow behavior, solidification and shrinkage, the interaction effect of surface tension, capillary force and gravity, by using the numerical simulation method. Finally, combining the information on defect detection and defect formation mechanisms to further accomplish the process optimization to achieve the objective of defect suppression and control in an SLM process.
6 Conclusions
Defect formation is a critical problem in the SLM processes. It has a significant influence on the real-world application of the SLM fabricated parts. This paper reviews defect formation mechanisms in SLM processes, discusses the effect of process parameters on defect formation, and proposes a strategy for defect suppression and control. Based on the review, the paper summarizes conclusions:
-
(1)
The common defects are three types, namely spherical porosities, irregularly incomplete fusion holes, and cracks. Spherical porosities are randomly distributed, while incomplete fusion holes are generally distributed between the tracks and layers.
-
(2)
Many process parameters, such as laser power, scan speed, hatch spacing, layer thickness, and scan strategy, have significant influences on the formation of defects. Energy density is an integrated parameter for controlling defect formation; scan strategy has a significant influence on the location distribution of defects, most of the defects distribute at both ends of scan tracks and in between two adjacent tracks.
-
(3)
Defect formation has a significant influence on the mechanical properties of the SLM fabricated parts, especially fatigue strength. Defects play a prominent role in fatigue crack initiation, directly reduce the fatigue life of a part, which restricts the application of the SLM technique.
The quality control in an SLM process relies on defect detection and elimination. For high quality SLM fabrications, defect monitoring, simulation and modeling, as well as real-time defect elimination become necessary. Defect-free SLM fabrications are anticipated in the near future.
Change history
03 August 2017
An erratum to this article has been published.
References
LU B H, LI D C. Development of the additive manufacturing (3D printing) technology. Machine Building Automation, 2013, (4): 1-4.
LI D C, HE J K, TIAN X Y et al. Additive manufacturing: integrated fabrication of macro/micro-structures. Journal of Mechanical Engineering. 2013, (6):129-135.
WANG H M. Materials’ fundamental issues of laser additive manufacturing for high-performance large metallic components. Acta Aeronautica Et Astronautica Sinica, 2014, 35(10): 2690-2698.
CAIAZZO F, CARDAROPOLI F, ALFIERI V, et al. Experimental analysis of selective laser melting process for Ti-6Al-4 V turbine blade manufacturing. 19th International Symposium on High-Power Laser Systems and Applications (HPLS&A), 2012.
YAN C, HAO L, HUSSEIN A, et al. Ti6Al4 V triply periodic minimal surface structures for bone implants fabricated via selective laser melting. Journal of the Mechanical Behavior of Biomedical Materials, 2015, 51: 61-73.
ZHAO J F, MA Z Y, XIE D Q, et al. Metal additive manufacturing technique. Journal of Nanjing University of Aeronautics and Astronautics, 2014, 46(5): 675-683.
THIJS L, VERHAEGHE F, CRAEGHS T, et al. A study of the microstructural evolution during selective laser melting of Ti–6Al–4 V. Acta Materialia, 2010, 58(9): 3303-3312.
RAFI H K, STARR T L, STUCKER B E. A comparison of the tensile, fatigue, and fracture behavior of Ti6Al4 V and 15-5 PH stainless steel parts made by selective laser melting. The International Journal of Advanced Manufacturing Technology, 2013, 69(5-8): 1299-1309.
CARTER L N, ATTALLAH M M, REED R C. Laser powder bed fabrication of nickel-base superalloys: influence of parameters; characterization, quantification and mitigation of cracking. 12th International Symposium on Superalloys, 2012: 795-802.
JIA Q B, GU D D. Selective laser melting additive manufacturing of Inconel 718 superalloy parts: densification, microstructure and properties. Journal of Alloys and Compounds, 2014, 585: 713-721.
GU D D, SHEN Y F. Research statues and technical of rapid manufacturing of metallic part by selective laser melting. Aeronautical Manufacturing Technology, 2012(8): 32-37.
ZHAO G Y, WANG D D, BAI P K, et al. Research progress of laser rapid prototyping technology for aluminum alloy. Hot Working Technology, 2010, 39(9): 170-173,177.
LI R D, LIU J H, SHI Y S, et al. 316L stainless steel with gradient porosity fabricated by selective laser melting. Journal of Materials Engineering and Performance, 2010, 19(5): 666-671.
YADROISEV I, GUSAROV A, YADROITSAVAI, et al. Single track formation in selective laser melting of metal powders[J]. Journal of Materials Processing Technology, 2010, 210(12): 1624-1631.
WU W H, YANG Y Q, LAI K X. Process analysis of rapid prototyping with selective laser melting. Journal of South China University of Technology (Natural Science Edition), 2007(3):22-27.
HUSSEIN A, HAO L, YAN C, et al. Finite element simulation of the temperature and stress fields in single layers built without-support in selective laser melting. Materials & Design, 2013, 52: 638-647.
VRANCKEN B, THIJS L, KRUTH J, et al. Heat treatment of Ti6Al4 V produced by selective laser melting: microstructure and mechanical properties. Journal of Alloys and Compounds, 2012, 541: 177-185.
XU W, SUN S, ELAMBASSERIL J, et al. Ti6Al4 V additively manufactured by selective laser melting with superior mechanical properties. JOM, 2015, 67(3): 668-673.
ZHANG X B, DANG X A, YANG L Y. Study on balling phenomena in selective laser melting. Laser and Optoelectronics Progress, 2014(6): 131-136.
THIJS L, KEMPEN K, KRUTH J, et al. Fine-structured aluminum products with controllable texture by selective laser melting of pre-alloyed AlSi10 Mg powder. Acta Materialia, 2013, 61(5): 1809-1819.
GONG H J, RAFI K, KARTHIK N V, et al. Defect morphology of Ti-6Al-4 V parts fabricated by selective laser melting and electron beam melting. International Solid Freeform Fabrication Symposium, 2013.
GU D D, HAGEDORN Y, MEINERS W, et al. Densification behavior, microstructure evolution, and wear performance of selective laser melting processed commercially pure titanium. Acta Materialia, 2012, 60(9): 3849-3860.
ABOULKHAIR N T, EVERITT N M, ASHCROFT I, et al. Reducing porosity in AlSi10 Mg parts processed by selective laser melting. Additive Manufacturing, 2014, 1-4: 77-86.
VILARO T, COLIN C, BARTOUT J D. As-fabricated and heat-treated microstructures of the Ti6Al4 V alloy processed by selective laser melting. Metallurgical and Materials Transactions A, 2011, 42(10): 3190-3199.
KEMPEN K, THIJS L, VAN H J, et al. Processing AlSi10 Mg by selective laser melting: parameter optimization and material characterization. Materials Science and Technology, 2014, 31(8): 917-923.
KEMPEN K, VRANCKEN B, BULS S, et al. Selective laser melting of crack-free high density M2 high speed steel parts by baseplate preheating. Journal of Manufacturing Science and Engineering, 2014, 136(6).
CARTER L N, ESSA K, ATTALLAH M M. Optimization of selective laser melting for a high temperature Ni-superalloy. Rapid Prototyping Journal, 2015, 21(4): 423-432.
QIU C L, ADKINS N J E, ATTALLAH M M. Microstructure and tensile properties of selectively laser-melted and of HIPed laser-melted Ti6Al4 V. Materials Science and Engineering: A, 2013, 578: 230-239.
GONG H J, RAFI K, GU H F, et al. Analysis of defect generation in Ti6Al4 V parts made using powder bed fusion additive manufacturing processes. Additive Manufacturing, 2014, 1-4: 87-98.
RAFI H K, KARTHIK N V, Gong H J, et al. Microstructures and mechanical properties of Ti6Al4 V parts fabricated by selective laser melting and electron beam melting. Journal of Materials Engineering and Performance, 2013, 22(12): 3872-3883.
WEINGARTEN C, BUCHBINDER D, PIRCH N, et al. Formation and reduction of hydrogen porosity during selective laser melting of AlSi10 Mg. Journal of Materials Processing Technology, 2015, 221: 112-120.
ROLINKG, VOGT S, SENCEKOVA L, et al. Laser metal deposition and selective laser melting of Fe-28 at.% Al. Journal of Materials Research, 2014, 29(17): 2036-2043.
WANG L, WEI Q S, HE W T, et al. Influence of powder characteristic and process parameters on SLM formability. Journal of HuaZhong University of Science and Technology (Natural Science Edition), 2012, 40(6): 20-23.
WEN S F, LI S, WEI Q S, et al. Effect of molten pool boundaries on the mechanical properties of selective laser melting parts. Journal of Materials Processing Technology, 2014, 214(11): 2660-2667.
WU W H, YANG Y Q, WANG D. Balling phenomenon in selective laser melting process. Journal of South China University of Technology (Natural Science Edition), 2010(5): 110-115.
GU D D, SHEN Y F. Balling phenomena in direct laser sintering of stainless steel powder: metallurgical mechanisms and control methods. Materials & Design, 2009, 30(8): 2903-2910.
LIU Q C, ELAMBASSERIL J, SUN S J, et al. The effect of manufacturing defects on the fatigue behavior of Ti6Al4 V specimens fabricated using selective laser melting. Advanced Materials Research, 2014, 891-892: 1519-1524.
ZHOU X, WANG D, LIU X, et al. 3D-imaging of selective laser melting defects in a Co-Cr-Mo alloy by synchrotron radiation micro-CT. Acta Materialia, 2015, 98: 1-16.
READ N, WANG W, ESSA K, et al. Selective laser melting of AlSi10 Mg alloy: process optimization and mechanical properties development. Materials & Design, 2015, 65: 417-424.
ZHANG S, GUI R Z, WEI Q S, et al. Cracking behavior and formation mechanism of TC4 alloy formed by selective laser melting. Journal of Mechanical Engineering, 2013, 49(23): 21-27. (in Chinese)
LI R D, SHI Y S, WANG Z G, et al. Densification behavior of gas and water atomized 316L stainless steel powder during selective laser melting. Applied Surface Science, 2010, 256(13): 4350-4356.
ZHAO X, LIN X, CHEN J, et al. The effect of hot isostatic pressing on crack healing, microstructure, mechanical properties of Rene88DT superalloy prepared by laser solid forming. Materials Science and Engineering: A, 2009, 504(1-2): 129-134.
CHEN J, LIN X, WANG T, et al. The hot cracking mechanism of 316L stainless steel cladding in rapid laser forming process. Rare Metal Materials and Engineering, 2003, 32(23): 183-186.
HABOUDOU A, PEYRE P, VANNES A B, et al. Reduction of porosity content generated during Nd:YAG laser welding of A356 and AA5083 aluminum alloys. Materials Science and Engineering: A, 2003, 363(1-2): 40-52.
CARTER L N, WANG X, READ N, et al. Process optimization of selective laser melting using energy density model for nickel based superalloys. Materials Science and Technology, 2015: 1-5.
YADROITSEV I, BERTRAND P, SMUROV I. Parametric analysis of the selective laser melting process. Applied Surface Science, 2007, 253(19): 8064-8069.
GONG H J, RAFI K, GU H F, et al. Influence of defects on mechanical properties of Ti6Al4 V components produced by selective laser melting and electron beam melting. Materials & Design, 2015, 86: 545-554.
XU W, BRANDT M, SUN S, et al. Additive manufacturing of strong and ductile Ti6Al4 V by selective laser melting via in situ martensite decomposition. Acta Materialia, 2015, 85: 74-84.
ZHANG S, WEI Q S, CHENG L Y, et al. Effects of scan line spacing on pore characteristics and mechanical properties of porous Ti6Al4 V implants fabricated by selective laser melting. Materials & Design, 2014, 63: 185-193.
SONG B, DONG S J, ZHANG B C, et al. Effects of processing parameters on microstructure and mechanical property of selective laser melted Ti6Al4 V. Materials & Design, 2012, 35: 120-125.
VANDENBROUCKE B, KRUTH J. Selective laser melting of biocompatible metals for rapid manufacturing of medical parts. Rapid Prototyping Journal, 2007, 13(4): 196-203.
LEUDERS S, LIENEKE T, LAMMERS S, et al. On the fatigue properties of metals manufactured by selective laser melting-the role of ductility. Journal of Materials Research, 2014, 29(17): 1911-1919.
WANG D, YANG Y Q, SU X B, et al. Study on energy input and its influences on single-track, multi-track, and multi-layer in SLM. The International Journal of Advanced Manufacturing Technology, 2012, 58(9-12): 1189-1199.
KURZYNOWSKI T, CHLEBUS E, KUZNICKA B, et al. Parameters in selective laser melting for processing metallic powders. Society of Photo-Optical Instrumentation Engineers (SPIE) Conference Series, 2012:823914-823914-6.
KEMPEN K, THIJS L, YASA E, et al. Process optimization and microstructural analysis for selective laser melting of AlSi10 Mg. Proceedings Solid Freeform Fabrication Symposium, Texas, USA. 2011
KEMPEN K, THIJS L, VAN H J, et al. Mechanical properties of AlSi10 Mg produced by selective laser melting. Physics Procedia, 2012, 39: 439-446.
MASKERY I, ABOULKHAIR N T, CORFIELD M R, et al. Quantification and characterization of porosity in selectively laser melted Al-Si10-Mg using X-ray computed tomography. Materials Characterization, 2016, 111: 193-204.
BAUEREISS A, SCHAROWSKY T, KOERNER C. Defect generation and propagation mechanism during additive manufacturing by selective beam melting. Journal of Materials Processing Technology, 2014, 214(11): 2522-2528.
WANG D, YANG Y Q, HUANG Y L, et al. Density improvement of metal parts directly fabricated via selective laser melting. Journal of South University of Technology (Natural Science Edition), 2010(6): 107-111.
YANG Y Q, SONG C H, WANG D. Selective laser melting and its application on personalized medical parts. Journal of Mechanical Engineering, 2014(21): 140-151.
ATTAR H, CALIN M, ZHANG L C, et al. Manufacture by selective laser melting and mechanical behavior of commercially pure titanium. Materials Science and Engineering: A, 2014, 593: 170-177.
SIMONELLI M, TSE Y Y, TUCK C. Effect of the build orientation on the mechanical properties and fracture modes of SLM Ti-6Al-4 V. Materials Science and Engineering: A, 2014, 616: 1-11.
LEUDERS S, THONE M, RIEMER A, et al. On the mechanical behavior of titanium alloy TiAl6V4 manufactured by selective laser melting: fatigue resistance and crack growth performance. International Journal of Fatigue, 2013, 48: 300-307.
FACCHINI L, MAGALINI E, ROBOTTI P, et al. Ductility of a Ti6Al4 V alloy produced by selective laser melting of pre-alloyed powders. Rapid Prototyping Journal, 2010, 16(6): 450-459.
KASPEROVICH G, HAUSMANN J. Improvement of fatigue resistance and ductility of TiAl6V4 processed by selective laser melting. Journal of Materials Processing Technology, 2015, 220: 202-214.
WU M W, LAI P, CHEN J. Anisotropy in the impact toughness of selective laser melted Ti6Al4 V alloy. Materials Science and Engineering: A. 2016, 650: 295-299.
CHLEBUS E, KUZNICKA B, KURZYNOWSK T, et al. Microstructure and mechanical behavior of Ti6Al7Nb alloy produced by selective laser melting. Materials Characterization, 2011, 62(5): 488-495.
EDWARDS P, RAMULU M. Fatigue performance evaluation of selective laser melted Ti6Al4 V. Materials Science and Engineering: A, 2014, 598: 327-337.
HOOREWEDER B V, BOONEN R, MOENS D, et al. On the determination of fatigue properties of Ti6Al4 V produced by selective laser melting. Journal of Thermal Analysis & Calorimetry, 2013, 113(113): 97-103.
REKEDAL K D, LIU D. Fatigue Life of selective laser melted and hot isostatically pressed Ti6Al4 V absent of surface machining. 56th AIAA/ASCE/AHS/ASC Structures, Structural Dynamics, and Materials Conference, AIAA SciTech, AIAA 2015-0894.
WYCISK E, EMMELMANN C, SIDDIQUE S, et al. High cycle fatigue (HCF) performance of Ti6Al4 V alloy processed by selective laser melting. Advanced Materials Research, 2013, 816-817: 134-139.
WYCISK E, SOLBACH A, SIDDIQUE S, et al. Effects of defects in laser additive manufactured Ti6Al4 V on fatigue properties. Physics Procedia, 2014, 56: 371-378.
LEUDERS S, VOLLMER M, BRENNE F, et al. Fatigue strength prediction for titanium alloy TiAl6V4 manufactured by selective laser melting. Metallurgical & Materials Transactions A, 2015, 46A(9): 3816-3823.
CLIJSTERS S, CRAEGHS T, BULS S, et al. In situ quality control of the selective laser melting process using a high-speed, real-time melt pool monitoring system. The International Journal of Advanced Manufacturing Technology, 2014, 75(5-8): 1089-1101.
PANWISAWAS C, QIU C L, SOVANI Y, et al. On the role of thermal fluid dynamics into the evolution of porosity during selective laser melting. Scripta Materialia, 2015, 105: 14-17.
Author information
Authors and Affiliations
Corresponding author
Additional information
Supported by National Natural Science Foundation of China (Grant No. 51605077), Science Challenge Project (Grant No. CKY2016212A506-0101) and Science Fund for Creative Research Groups of NSFC (Grant No. 51621064).
An erratum to this article is available at https://doi.org/10.1007/s10033-017-0184-3.
Rights and permissions
About this article
Cite this article
Zhang, B., Li, Y. & Bai, Q. Defect Formation Mechanisms in Selective Laser Melting: A Review. Chin. J. Mech. Eng. 30, 515–527 (2017). https://doi.org/10.1007/s10033-017-0121-5
Received:
Revised:
Accepted:
Published:
Issue Date:
DOI: https://doi.org/10.1007/s10033-017-0121-5
